Want to know how much virtual memory should I set for 8GB of ram? Here’s how to change virtual memory in Windows 10 or increase Windows 10 virtual memory.
What is the recommended virtual memory size for 16GB ram or 8GB ram in Windows 10? How to determine the appropriate page file size for 64-bit versions of Windows 10?
These are some of the most frequently asked questions by the users who want to make Windows 10 faster and improve its performance.
We all know that system memory is divided into two types – Virtual Memory and Random Access Memory.
The programs which are installed on our system use RAM or Random Access Memory. RAM is limited to all the systems or we would say it comes in modules. In case, the entire RAM which is present on a system is allocated to processes running, then Windows stores it to a file called Paging file (also known as the page file, pagefile, swap file) on Windows computers.
The Windows Paging File is also known as Virtual Memory. If you are moving the information to and from paging file of your system it will release enough RAM which can be used later on to run programs efficiently on your Windows 10 computer and increase multi-tasking.
It is possible that you might receive memory management errors too if there is no RAM available on your system. In this case, you can either go with an upgrade or add more RAM to your system or simply increase virtual memory in Windows 10 PC.
Going for the upgrade is going to cost you money so the better option would be to increase virtual memory on Windows 10 computer. Once you have changed the size of paging file on your system it will help you in adding more to the Windows 10 virtual memory.
Before knowing how to adjust default virtual memory size on Windows 10, let’s learn to calculate virtual memory size which will answer all your questions such as what is the optimal virtual memory size for 8GB ram in Windows 10? How big my Pagefile should be on Windows 10 PC?
How to Calculate Virtual Memory Size in Windows 10
Calculating virtual memory size in Windows 10 computer is pretty simple. You can apply the below-mentioned formula for calculating virtual memory and determining the appropriate page file size:
- The Initial size of paging file is equal to = one and a half (1.5) X the total amount of system memory.
- The Maximum size of paging file is equal to Three times (3) X Initial Size.
To make it simpler for you, let’s say that you are having 4GB RAM on your system i.e. 4096 MB. In this case:
- The Initial size is going to be 1.5 X 4096 MB = 6144 MB.
- And the Maximum size is going to be 3 X 6144 MB= 18432 MB.
Is it clear? Thus, you can see how simple is to calculate Windows 10 virtual memory size.
Once you calculated and determined the virtual memory size, now learn how to change virtual memory in Windows 10 PC
How to Change Windows 10 Virtual Memory
In order to adjust default virtual memory size or increase virtual memory in Windows 10 PC, you can follow the steps mentioned below:
Step (1): First of all, right-click on This PC desktop icon and then select Properties option to open the System window.
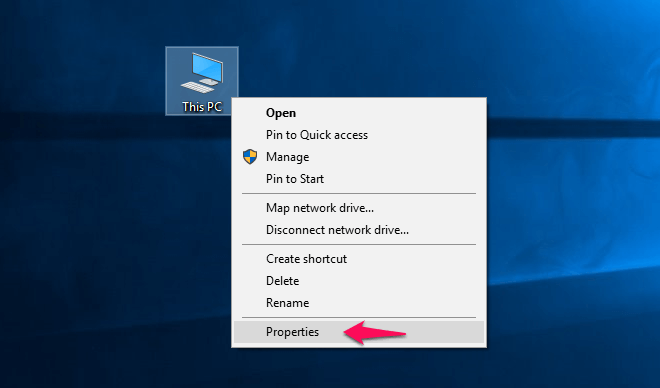
Alternatively, you can open System window by pressing Windows + Pause/Break key together.
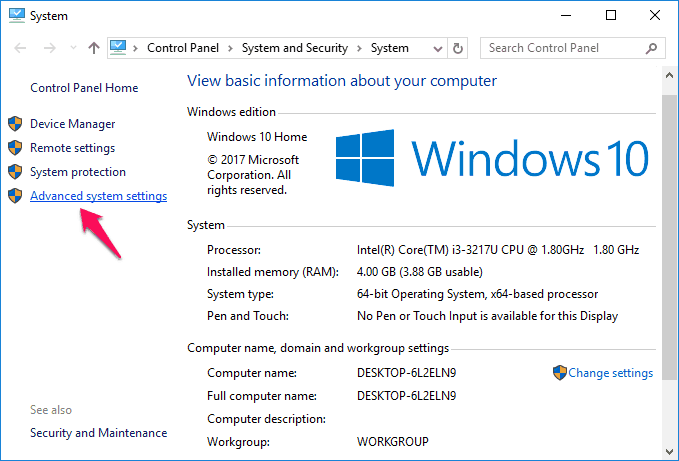
Step (2): On the System window, click on Advanced system settings link to open System Properties.
Step (3): On the System Properties dialog box, go to the Advanced tab and then click on the Settings button.
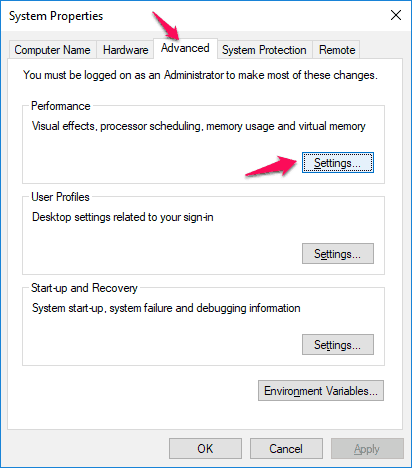
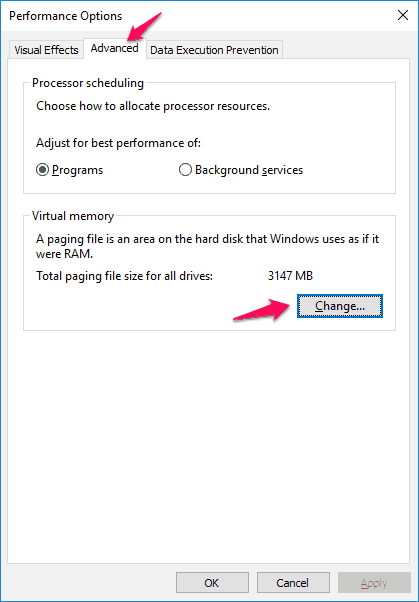
Step (4): Now the Performance Options dialog box will appear. Again here you have to go to the Advanced tab and then click on Change button which is available under Virtual Memory section.
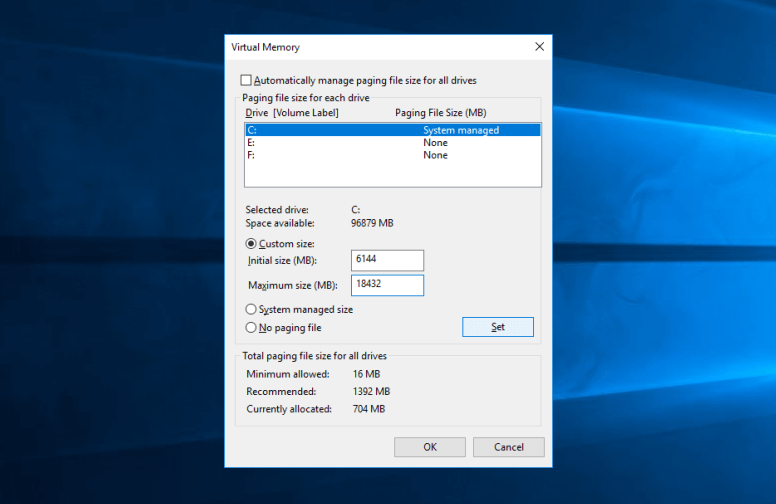
Step (5): On the Virtual Memory window, uncheck the “Automatically manage paging file size for all drives” option and then select “Custom size” option.
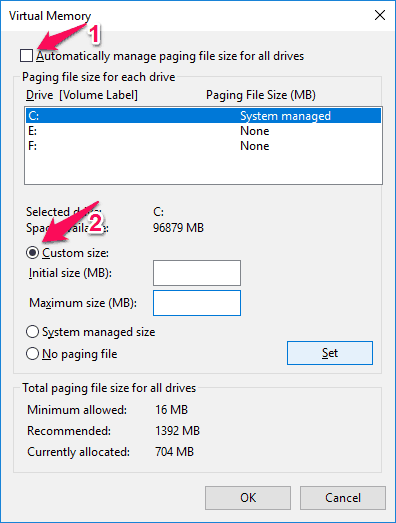
Step (6): Under the Custom size section and enter the Initial size and Maximum size virtual memory value using the virtual memory calculation formula explained above.
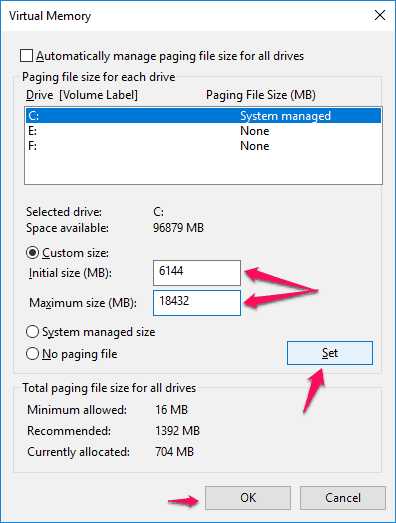
For the example: The Installed memory (RAM) on our system is 4GB, so here we are setting the Initial size = 6,144 MB and Maximum size = 18,432 MB.
Step (7): After entering the Initial size and Maximum size value, click on Set and then the OK button to apply those value. That’s it!
Windows 10 virtual memory will be changed, once you have followed all these steps correctly. We hope that now you know very well how to adjust default virtual memory size on Windows 10 computer.
This is the easiest method which you can follow to calculate virtual memory size and change virtual memory in Windows 10 computers.
Learn: How to Fix System and Compressed Memory High Disk Usage in Windows 10
nice article, very useful your post thanks for information provide