Learn how to disable Microsoft Compatibility Telemetry in Windows 10 and fix Microsoft compatibility telemetry high disk usage Windows 10 CompatTelRunner.exe
Frankly, there are many amazing features and valuable services available in Windows computers about which we all are not completely aware of. If you have explored your Windows 10 computer in-depth then only you would know all the operative features which you can use on your system.
One of such valuable features or processes in Microsoft Windows 10 operating system is Telemetry (also known as Microsoft Compatibility Telemetry or CompatTelRunner.exe or Windows 10 Telemetry) which you will find on your Windows 10 computer.
Image source: MSPoweruser.com
Windows Telemetry process is introduced with Windows 10 operating system and it is not known to many users. If you haven’t heard about this before or want to know – What is Telemetry in Windows 10? What is the use of Windows Telemetry Data? Or how to disable Microsoft compatibility telemetry in Windows 10 etc. then this tutorial might interest you.
What is Microsoft Compatibility Telemetry in Windows 10?
There are plenty of automated processes available in Windows 10 PC and one of these processes is Telemetry, which is also an important automated process. With this process, all sorts of user activity and data are stored at remote points which are transmitted back to parent location. Telemetry data collected by the Microsoft can be used for monitoring, measuring and improving all the services which your Windows 10 computer is providing you.
Type of hardware being used, applications installed, app usage details, and reliability information on device drivers etc. are some best examples of Windows telemetry data.
Microsoft collects all these data from the users who are using their Windows 10 operating system so that they can find out the issues faced by the users, what changes they can do to their operating system so that the entire quality is improved and much more.
Mainly, all the Windows 10 telemetry data are used to keep Windows up to date, keep Windows secure, reliable, and performant, offering improve Windows – through the aggregate analysis of the use of Windows, and personalize Windows engagement surfaces etc. You can follow this guide to learn how is telemetry data handled by Microsoft?
Should You Disable Windows 10 Telemetry?
Although, it is quite ideal sending your data to Microsoft in order to get better services in upcoming versions of Windows operating system. But many Windows 10 users don’t want to do the same. If you are also one of those users who do not want to send telemetry data and want to fix Microsoft compatibility telemetry high disk usage Windows 10 issue then disabling Windows telemetry feature is the best option for you.
You can have a look at the guide which we have shared below in order to know how to turn off Microsoft Compatibility Telemetry in Windows 10 operating system.
How to Disable Microsoft Compatibility Telemetry (CompatTelRunner.exe)?
Undoubtedly, CompatTelRunner.exe (Microsoft compatibility telemetry) is a legitimate system file. But when you will see this process running in the task manager, you will be surprised to know that CompatTelRunner.exe is using an extremely large amount of your CPU resources. And if you try ending the task, it won’t work.
Actually, Windows 10 comes with the telemetry feature enabled by default and unfortunately, there is no direct way to turn off it completely using the Settings app. But don’t worry, we have found some amazing techniques to disable Windows 10 telemetry feature and that’s the main reason we created this tutorial.
There are plenty of methods available on the internet which you can follow in order to disable CompatTelRunner.exe process and solve Microsoft compatibility telemetry Windows 10 high disk usage problem. But here we have explained some of the most active solutions and you can follow any of these methods as per your choice. Here we go.
Method 1: Disable CompatTelRunner.exe using Command Prompt
This is the first method which you can follow to disable Microsoft Compatibility Telemetry in Windows 10 Operating system. Here we are going to take the help of command prompt.
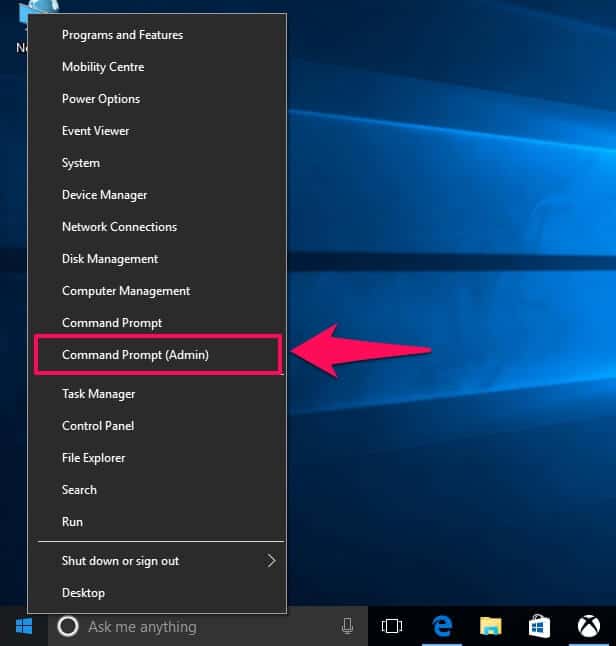
Step (1): First of all, open command prompt as administrator by pressing Windows + X keys and selecting Command Prompt (Admin) from the list of options displayed.
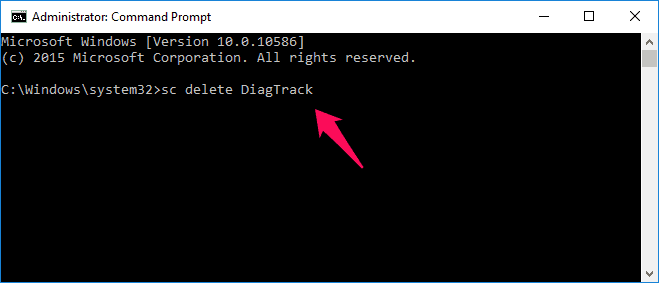
Step (2): Once the command prompt with administrative privileges is opened on your computer, enter the following command lines one by one and press Enter button:
sc delete DiagTrack
sc delete dmwappushservice
echo “” > C:\ProgramData\Microsoft\Diagnosis\ETLLogs\AutoLogger\AutoLogger-Diagtrack-Listener.etl
reg add “HKLM\SOFTWARE\Policies\Microsoft\Windows\DataCollection” /v AllowTelemetry /t REG_DWORD /d 0 /f
Finally, restart your Windows 10 computer. Applying these commands will immediately disable CompatTelRunner.exe on Windows 10 PC.
Method 2: Disable Microsoft Compatibility Telemetry using Registry Editor
Disabling Windows 10 telemetry task using registry editor is also a very helpful way to fix high CPU and high disk usage by CompatTelRunner.exe. Here’s how:
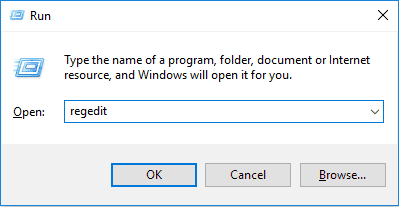
Step (1): At first, open Run dialog box by pressing the combinations of Windows + R keys together and then enter regedit in it to open Registry Editor on your computer.
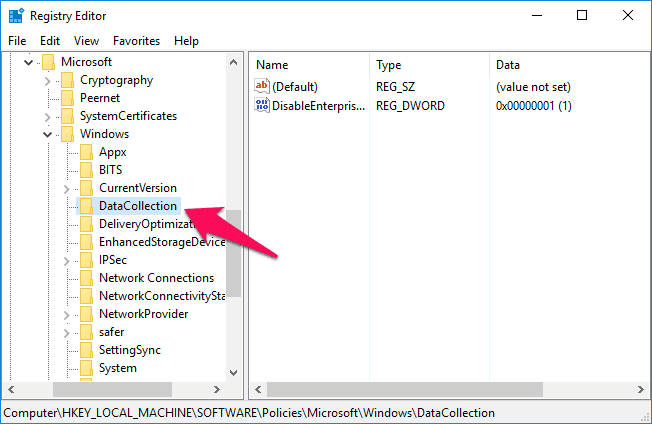
Step (2): In the left pane of Registry Editor, navigate to the following registry key:
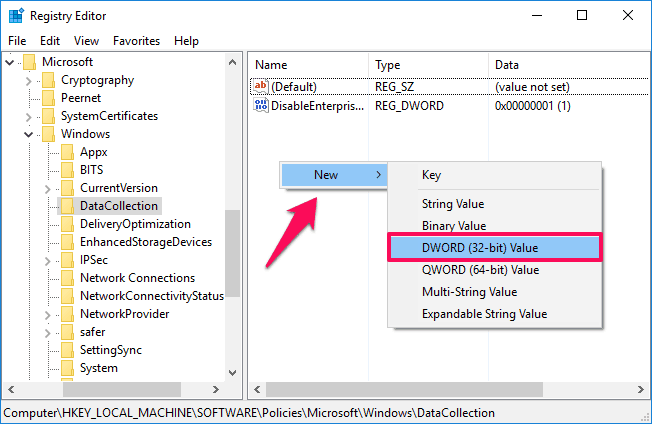
HKEY_LOCAL_MACHINE\SOFTWARE\Policies\Microsoft\Windows\DataCollection
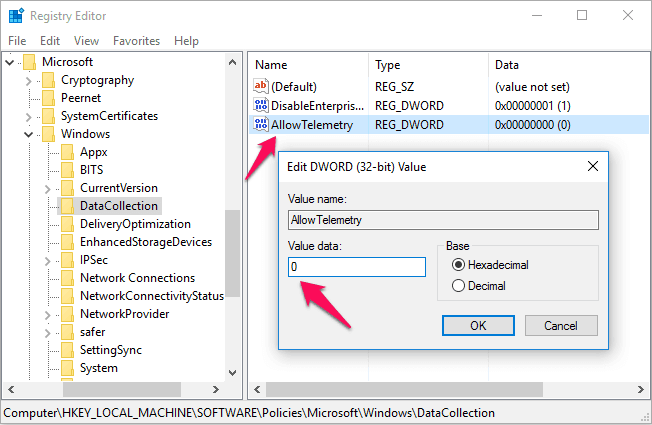
Step (3): After locating DataCollection key, right-click on the blank area of right pane and select New > DWORD (32-bit) Value and then name this new DWORD as AllowTelemetry.
Step (4): Now double click on AllowTelemetry and set value 0 to it. That’s it!
Once done, finally restart your computer. Thus, you can easily disable telemetry process in Windows 10 computer.
Method 3: Disable Microsoft Compatibility Telemetry in Windows 10 using Windows PowerShell
In case, you were not able to disable Microsoft compatibility telemetry (CompatTelRunner.exe) in Windows 10 computer after following the above-mentioned methods then you can use the procedure mentioned in this last method. We will use Windows Powershell in this method. Here we go:
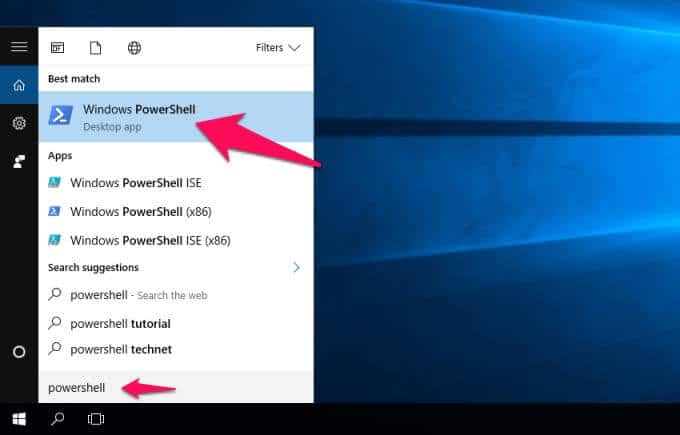
Step (1): Firstly, go to the Start menu and then type powershell in the Windows 10 search bar.
Step (2): Now from the search results, right-click on Windows Powershell and then select “Run as Administrator” option.
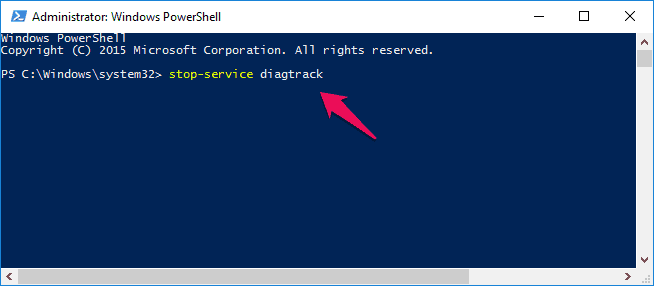
Step (3): Once the Windows Powershell with administrator privileges is opened, execute the following commands one by one:
stop-service diagtrack
set-service diagtrack -startuptype disabled
Applying both these commands will disable Windows 10 telemetry task completely. Now as you have successfully disabled CompatTelRunner.exe Windows 10 process, your Windows 10 computer won’t send any reports or usage information to the Microsoft. Addition to this, the Microsoft compatibility telemetry high CPU usage issue will be solved.
Conclusion
So, these are the three best methods which you can follow to disable Windows 10 telemetry feature. Let us know using the comments section below – Which method did you follow to disable Windows Telemetry process and fix Microsoft compatibility telemetry Windows 10 high disk usage problem?
There is no any secret that Windows 10 records all sorts of usage information to help with the smooth running of Windows 10 operating system and to get an idea of how users interact with the OS. But in case you are extremely worried about your personal information, disabling Telemetry and Data Collection in Windows 10 is the right choice for you.
After checking out the above-explained methods, we hope now you found the perfect answer to your questions – How do I disable CompatTelRunner.exe? How to disable Microsoft Compatibility Telemetry in Windows 10 completely?
Do you know? How to Fix Windows 10 Losing Internet Connection Intermittently
