Do you want to know where is the Snipping Tool in Windows 10 and how to open It? Let’s learn how to take a screenshot on Windows 10 with Snipping Tool.
The people who use their Windows devices a lot tend to take a lot of screenshots of their display for a myriad of reasons. At some point, you may have had thought, where is the Snipping Tool in Windows 10 computer?
You may be a student writing an essay that needs an interactive media component, maybe a corporate employee that needs to take a screenshot of the latest figures to present to the management or maybe just a writer like me who creates guides to help you guys. The questions still remain, where’s the Snipping Tool in Windows 10 and how to take a screenshot on Windows 10 with Snipping Tool?
Well, in this detailed guide, we will tell you all the things you need to know about the Snipping Tool on Windows 10 and how to take a screenshot using the Snipping Tool. So, without further ado, let’s dive right in
Where is the Snipping Tool in Windows 10?
As we are all aware, Snipping Tool is a built-in Windows screenshot utility (included in Windows Vista and later versions of Windows) that allows users to easily take screenshots of an open window, rectangular areas, a free-form area, or the entire screen. When a snip is captured, it’s automatically copied to the Snipping Tool window where you can make changes to it, save it, or share it according to your wish.
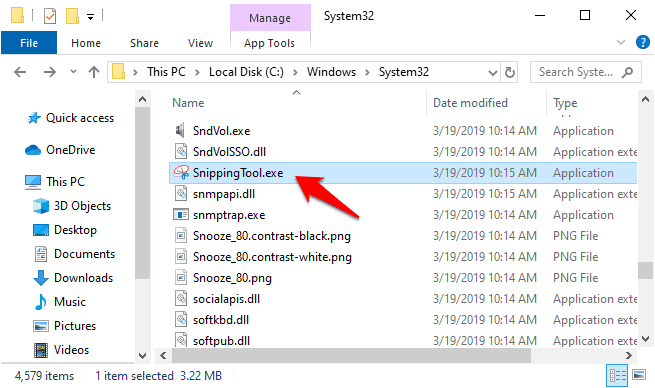
The Snipping Tool on Windows 10 is usually located in the System32 folder on the drive where Windows is installed (usually the C Drive). So just navigate to the Windows 10 Snipping Tool file location (This PC > Local Disk (C:)> Windows> System32) below, and search for the SnippingTool.exe (Snipping Tool) and you will find it:
C:\Windows\System32
There is another Windows 10 Snipping Tool location that you can use in order to get it. The snipping tool can also be accessed via this file path:
C:\ProgramData\Microsoft\Windows\Start Menu\Programs\Accessories
If your Windows installation is on another disk, just replace C:\ with whatever drive letter is assigned to the disk where Windows is installed.
How to Open Snipping Tool in Windows 10
Since now you know where to find Snipping Tool in Windows 10 operating systems, now it’s time to check out some of the easiest and best ways to open the snipping tool on Windows 10 PC. Undoubtedly, there are plenty of methods to open the Snipping Tool in Windows 10 computers and laptops but here we have mentioned only some of the most common and quick ways. So, let’s begin:
Method 1: Open Snipping Tool from Windows 10 Start Menu
One of the easiest ways to open the snipping tool on Windows 10 PC is through the Start Menu. To launch the Windows 10 Snipping Tool using the Start menu:
- At first, click on the Windows 10 Start button.
- Now scroll down and expand the Windows Accessories folder.
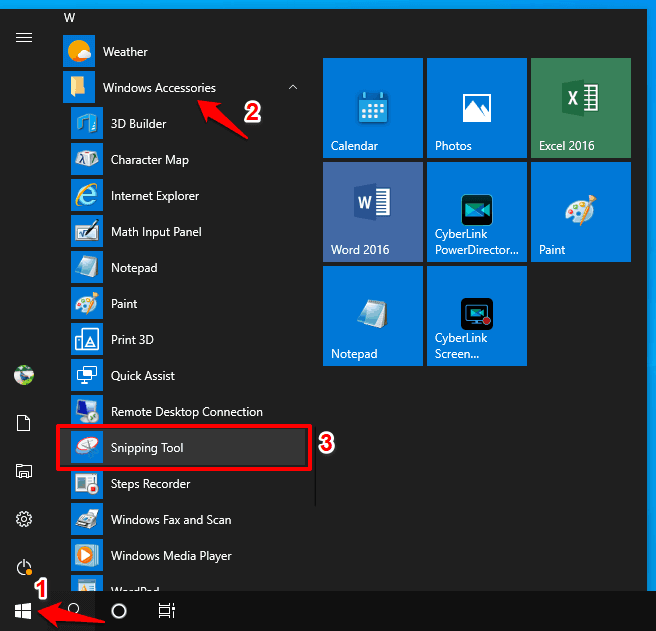
- Finally, click on the Snipping Tool shortcut to open it.
Method 2: Open Snipping Tool via Windows 10 Search
This is my personal favorite method to open Snipping Tool in Windows 10 and take screenshots with it. Also, I consider this to be the easiest and fastest way to use snipping tool in Windows 10 operating systems. Here’s how to do so:
- First of all, press the Windows key on your keyboard.
- And then type Snip and Snipping Tool will pop up in the search result.
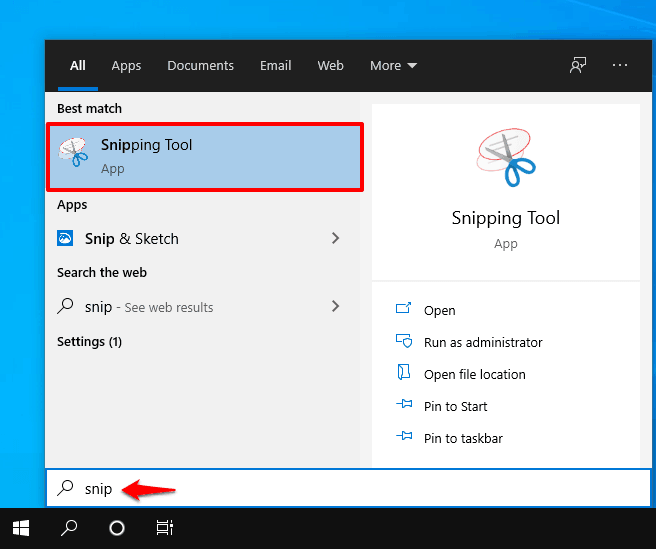
- Simply, click on the Snipping Tool to open it.
Method 3: Open Snipping Tool using Run Dialog-Box
If you love using the Run commands to directly open any application on Windows OS then you can also launch the Snipping Tool on Windows 10 using the run dialog box. Here’s how to do so:
- Press the Windows + R keys together to open the Run dialog box.
- Next, type snippingtool in the Open box and then press the Enter key.
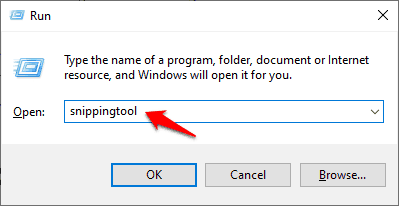
The Snipping Tool will appear the moment you hit Enter
Method 4: Open Snipping Tool via Command Prompt
If you are one of us, the nerds and prefer to use the command-line interface instead of a GUI then you can use this method to open the Snipping Tool on Windows 10 using the Command Prompt window. Here’s how:
- At first, press the Windows + X keys together.
- Now from the power user menu, click on the Command Prompt option.
- Now in the Command Prompt window, type snippingtool.exe and hit the Enter key.
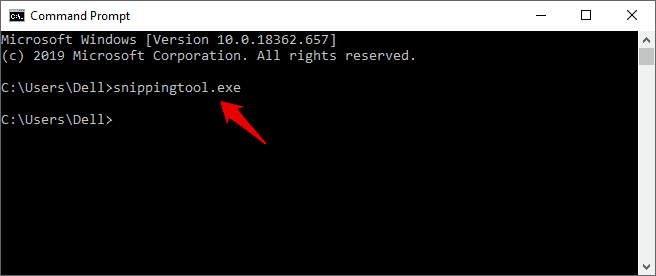
The Windows 10 Snipping Tool will appear instantly.
Method 5: Open Snipping Tool via Windows PowerShell
PowerShell is basically Command prompt on steroids and if you want you can open Snipping Tool in Windows 10 using this supercharged Windows command-line shell. Here’s how to do so:
- First of all, press the Windows key on your keyboard and then search for PowerShell.
- The Windows PowerShell option will show up in the result section, click on it.
- Now in the Windows PowerShell window, type snippingtool and then press the Enter key.
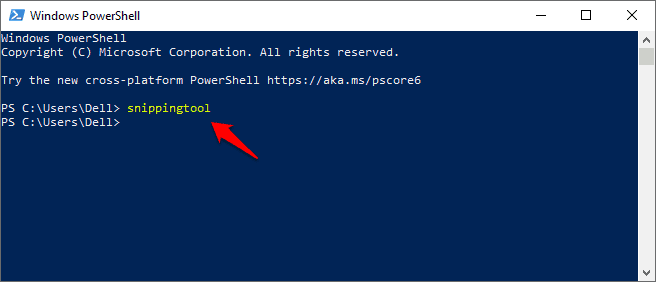
Once you hit the Enter and the Snipping Tool will open.
How to Create a Keyboard Shortcut for Snipping Tool in Windows 10
Many of us need to frequently take screenshots of our screen and it can get cumbersome if we have to open the Snipping Tool all the time just to take a screenshot. Thankfully, we can create custom Windows 10 Snipping Tool shortcut keys (keyboard shortcuts) that will let you open Snipping Tool just by pressing a hotkey.
Setting up a Windows 10 Snipping Tool keyboard shortcut is a pretty simple process. Follow these steps and learn how to create a keyboard shortcut for Snipping Tool in Windows 10 PC:
Step (1): At first, open the File Explorer and then navigate to the following folder path:
C:\ProgramData\Microsoft\Windows\Start Menu\Programs\Accessories
Step (2): In the Windows Accessories folder, right-click on the Snipping Tool or SnippingTool.exe program and then select Properties option.
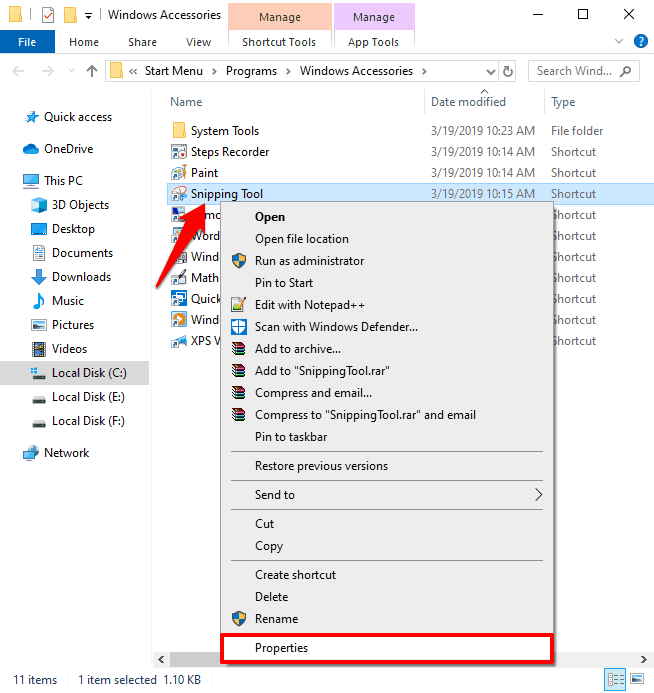
Step (3): On the Snipping Tool Properties dialog box, go to the Shortcut tab and then in the Shortcut key section, press the key you wish to set as the shortcut.
You can choose from F1 to F12 or Number 0 to 9 using the Numpad. If you wish to use any other key then Windows will require you to use Control + Alt + a key of your choice.
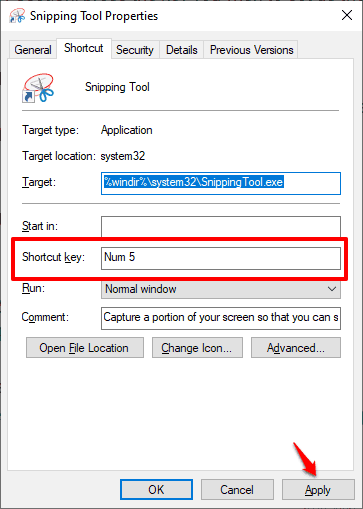
For example: Here we have selected Number 5 as the Windows 10 Snipping Tool shortcut key.
Step (4): Once you choose a keyboard shortcut key you are comfortable with, simply click on the Apply and then OK button.
This is how you can easily create a keyboard shortcut for Snipping Tool in Windows 10 operating systems and use it for capturing screenshots with ease.
How to Use Snipping Tool in Windows 10 to Capture Screenshots
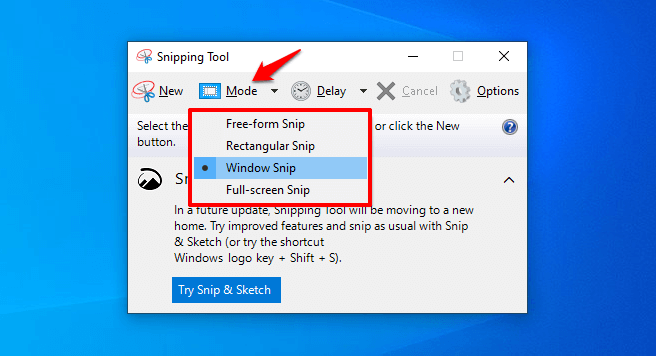
To quickly open and capture screenshots on Windows 10 system, you can use the nipping Tool shortcut key you set in the previous method. But you can also search for the Snipping Tool from the Windows 10 Start menu. There are multiple options to choose from to capture a screenshot on Windows 10 machines, simply click on the Mode menu to choose the kind of screenshot you wish to take. There are:
- Free-form Snip: This screenshot taking method lets you draw and captures any part of the screen you wish without aspect locking.
- Rectangular Snip: This screenshot capturing method will allow you to drag the cursor around an object to form a rectangle and that rectangle will be screenshotted
- Window Snip: This screenshot method allows you to select an open window, such as a browser window or dialog box and let you capture it in full without any cropping
- Full-screen Snip: As the name suggests, this method captures the entire screen when you select this type of snip.
You can also quickly take a screenshot if you press the Windows + Print Screen (PrntSC) button together. This again quickly takes a screenshot with the last used configuration without opening the snipping tool.
Once you select the kind of screenshot you want and take a screenshot on Windows 10 with the snipping tool, click on the New menu to take another screenshot. This image is then saved to the Pictures folder of your system.
Windows 10 Keyboard Shortcuts to Use in Snipping Tool
Are you looking for the Snipping Tool keyboard shortcuts or want some of the most helpful Windows 10 Keyboard shortcuts to use in Snipping Tool? If yes then here are some regularly used Windows 10 Snipping Tool keyboard shortcuts that make taking screenshots more effortless and smoother:
- Alt + M – Allows you to choose a snipping mode
- Alt + N – Allows you to capture a new snip in the same mode as the last one
- Shift + Arrow keys – Allows you to move the cursor to select a rectangular snip area
- Alt + D – Allows you to delay the capture of your screenshot by 1-5 seconds
- Ctrl + C – Allows you to easily copy the snip to clipboard and paste it wherever you see fit.
Final Words – Where’s the Snipping Tool in Windows 10?
I’m sure by now you are a pro in using the Snipping Tool on Windows 10 computers or laptops. Now go and impress whoever may be impressed by your newly possessed knowledge about using the Snipping Tool in Windows 10 for capturing screenshots.
All your questions (Where is the snipping tool in Windows 10? How to open the snipping tool in Windows 10? How to use the snipping tool in Windows 10? and How to create a Snipping Tool shortcut in Windows 10?) must have been answered by now but if you have any more of those then leave them in the comments below and we’ll sort it out with you as quick as possible.
You may also be interested in checking out:
- How to Take Screenshot of Selected Area in Windows 10
- How to Record Your Screen on Windows 10 with Sound for Free
- How to Take a Screenshot on Windows 10
- How to Move a Window that is Off Screen in Windows 10 PC
- How to Fix Windows 10 Taskbar Not Hiding in Fullscreen
- How to Change Lock Screen Timeout Period in Windows 10