Do you want to disable Driver Signature Enforcement in Windows 10 permanently? If “Yes” then you are at the right place.
We have received many requests from our readers asking – What is driver signature enforcement in Windows 10 and what are the best ways to disable driver signature enforcement Windows 10 permanently. And that’s the main reason for us to bringing out this guide.
The purpose of disabling driver signature enforcement on Windows 10 might be different from each other for many Windows users. Some users want to disable this feature temporarily for just solving a specific windows error, while some users want to disable it permanently to bypass the prevention.
Image credit: Digitaltrends.com
Well, before knowing how to disable driver signature verification on Windows 10 permanently or temporarily, let’s find out first what is driver signature enforcement and what does disable driver signature enforcement do? Here we go.
What is Driver Signature Enforcement in Windows 10?
We all install various drivers on our Windows computer. Some of the drivers work properly while some don’t. Do you know why? Because in order to provide maximum security, Windows requires a digitally signed driver and all the drivers installed on our Windows computer should be digitally signed with a Microsoft digital signature.
Basically, Driver Signature Enforcement is a security feature in Windows operating systems which has been specifically designed to prevent unsigned device drivers from being loaded and executed.
Microsoft verifies all the drivers which are manufactured by companies and if any driver is not officially signed by the Microsoft, Windows 10 computer won’t install that driver on your computer.
With electronic security mark, you will get information about the publisher of the driver and you can also find out if someone has changed the information or details about the drivers which you are about to install on your computer.
Why Do You Need to Disable Driver Signature Enforcement in Windows 10?
Now that you know – what is driver signature enforcement? You might be wondering why you have to disable driver signature enforcement Windows 10 feature.
As we all know, Windows 10 requires a digitally signed driver and there are plenty of useful and free device drivers which don’t come with digital signature authentication. And installing any unsigned device driver will always result in a blue screen of death during the startup process or unusual Windows errors like “Windows cannot verify the digital signature for the drivers required for this device” and “The driver is not digitally signed” while running the program supporting that driver.
So, if you want to install any unsigned device driver on your Windows 10 computer then you will have to disable driver signature enforcement feature as without disabling Windows 10 digital signature you won’t be able to install the drivers.
How to Disable Driver Signature Enforcement on Windows 10 Permanently
Undoubtedly, Windows 10 driver signature enforcement is an amazing security feature if you are really concerned about your safety. But there are some situations in our daily computer use when you need to install drivers that aren’t digitally signed by the Microsoft, and that’s why today we’re going to show you some best methods of disabling driver signature enforcement in Windows 10 computer.
Although, there are plenty of methods available on the internet which helps you to disable driver signature verification in Windows 10 but if you are looking for the easiest and most helpful way then below explained solutions are the best for you. Let’s check out how to disable driver signature enforcement in Windows 10 permanently and temporarily:
Method 1: Disable Driver Signature Enforcement from Startup Settings
Before disabling driver signature enforcement feature from Startup Settings, keep one thing in mind that this method only temporarily disables driver signature enforcement. So, if you want to disable driver signature verification permanently then follow the second method.
Let’s check out now how to disable driver signature enforcement Windows 10 feature from Startup Settings:
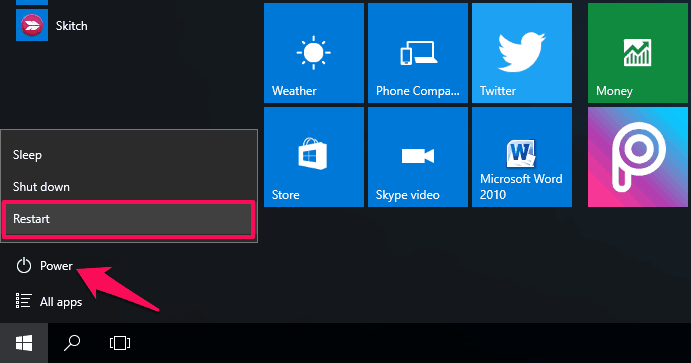
Step (1): First of all, go to Start menu and click on Power button and then select Restart option.
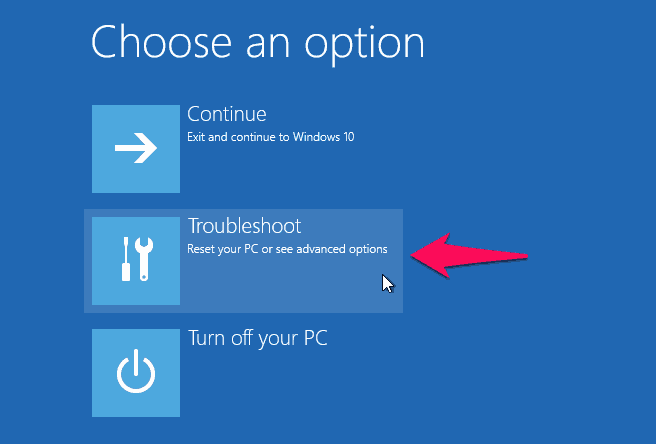
Step (2): Now your computer will restart into the menu. You have to select “Troubleshoot” option.
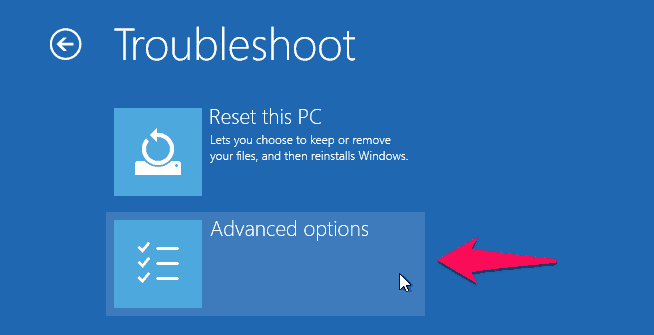
Step (3): In the Troubleshoot section, you have to click on “Advanced options”.
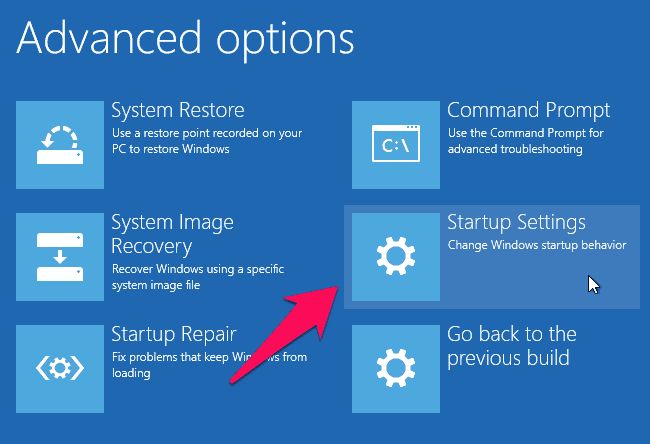
Step (4): In the Advanced options section, select “Startup Settings” option.
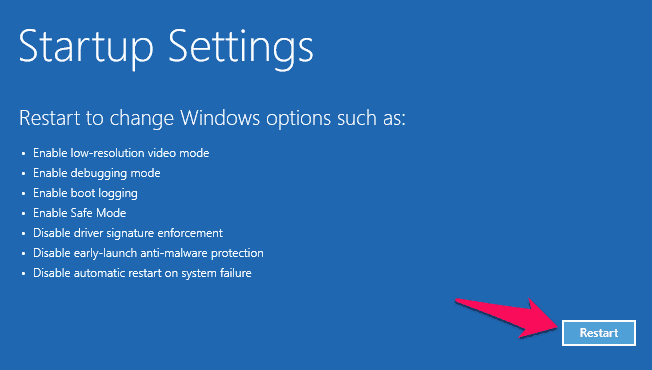
Step (5): Now on the Startup settings section, click on the Restart button to restart your PC.
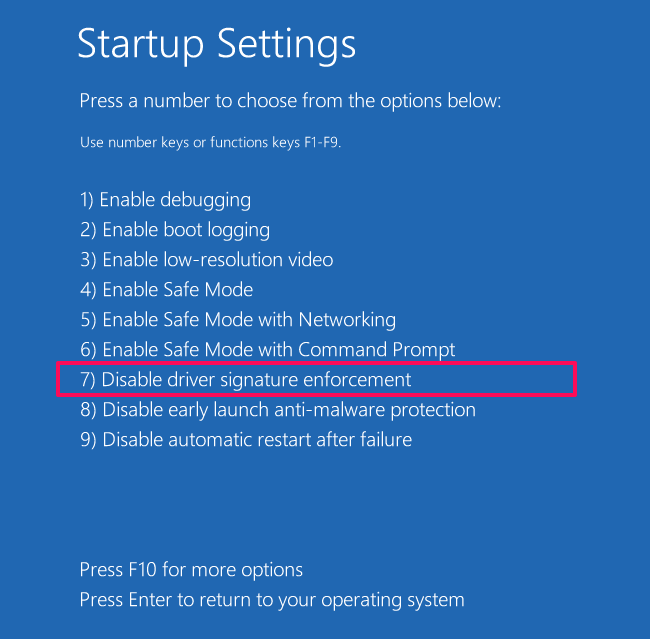
Step (6): After restarting PC in Startup Settings, type “7” or press the “F7” key on your keyboard to select “Disable driver signature enforcement” option.
Just after selecting the Disable driver signature enforcement option in Startup settings screen, your Windows 10 PC will reboot and driver signature verification feature will be disabled successfully.
Now, you can proceed to install unsigned drivers on your Windows 10 computer. In case, if you face “Windows cannot verify the digital signature for the drivers required for this device. A recent hardware or software change might have installed a file that is signed incorrectly or damaged, or that might be malicious software from an unknown source. (Code 52)” error during the driver installation procedure then just ignore the warning message displayed in the Device Status text box and select “Install this driver software anyway” option to complete the installation.
Method 2: Disable Driver Signature Enforcement Windows 10 Permanently
If you have followed the above-mentioned method to disable Driver Signature Enforcement Windows 10 feature, it means you have disabled the driver signature verification feature temporarily as the driver signature enforcement will be restored after reboot.
In order to disable Driver Signature Enforcement on Windows 10 Permanently, follow these steps explained below:
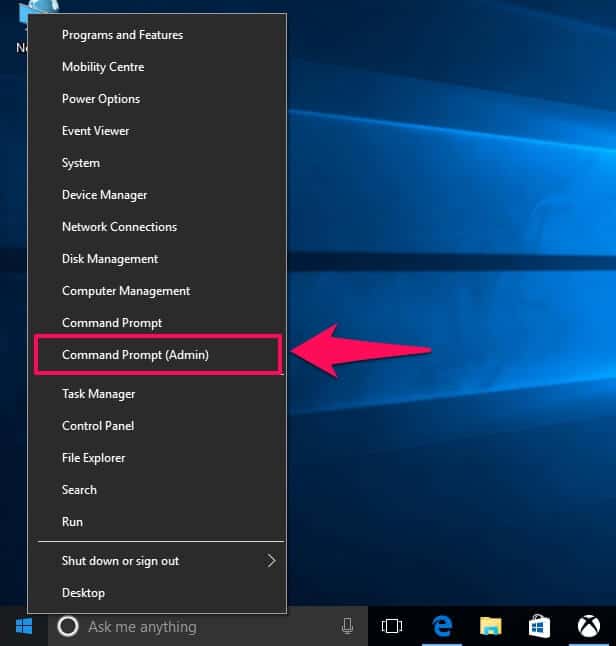
Step (1): First of all, open command prompt as administrator by pressing Windows + X keys and selecting Command Prompt (Admin) from the list of options displayed.
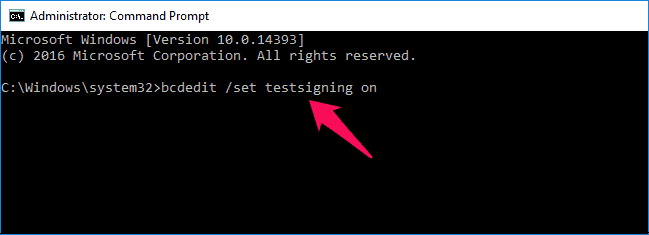
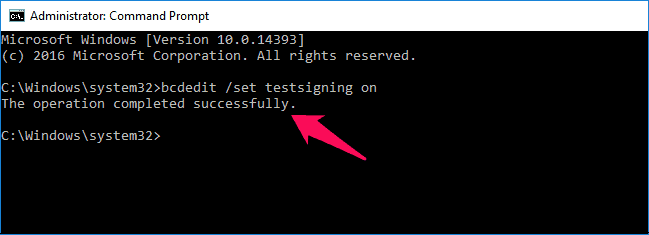
Step (2): Once the command prompt with administrative privileges is opened on your computer, enter the following command line and press Enter button:
bcedit /set testsigning on
Step (3): Just after executing the above command, you will be able to see “The operation completed successfully” message.
Step (4): Now, restart your Windows 10 computer. That’s it!
Or alternatively, you can also enter the following command lines in the elevated command prompt of your Windows 10 computer:
bcdedit.exe -set loadoptions DDISABLE_INTEGRITY_CHECKS
bcdedit.exe -set TESTSIGNING ON
Execute the above mentioned commands one by one and once done, close command prompt. Finally, restart your computer so that changes can take effect.
Thus, you can see how simple is to disable driver signature enforcement on Windows 10 permanently. Now, you can install unsigned device drivers without any issue.
Conclusion
So, these two are some of the best methods to disable driver signature enforcement Windows 10 feature permanently and temporarily. Now that you have followed the above two methods, you can try installing any unsigned driver on your Windows 10 computer. Without any Windows error, you will be able to install the drivers even if they are not officially signed by the Microsoft or not having the Microsoft digital signature.
Disabling driver signature verification feature is the most helpful solution to solve “Windows cannot verify the digital signature for the drivers required for this device.” error in Windows 10 PC.
We hope that now you are able to easily disable driver signature enforcement in Windows 10 and install unsigned drivers on your computer. Feel free to let us know using the comments section below if you are not able to install Windows 10 unsigned drivers or having any issues regarding driver signature enforcement.
Do you know? How to Disable or Uninstall OneDrive from Windows 10
