This guide explains how to add a program to the right-click menu and how to remove items from the right-click context menu in Windows 10 laptop or PC.
Do you want to remove items from the right-click context menu in Windows 10 because there are too many items on your Windows right-click context menu and it’s really annoying for you?
Are you interested in adding your most frequently used programs to the right-click context menu in Windows 10 for faster access? Or simply you want to clean up and customize your cluttered Windows 10 right-click context menu?
A context menu (also known as right-click menu, contextual, shortcut, and pop-up menu) is a menu that appears when you press the right button of your mouse on the desktop or a selected file or folder in Windows. It provides you more commands over the selected item.
The right-click context menu is one of the most effective and most often exercised features of the Windows operating systems. Because with a simple right-click mouse operation, you get the quick access to a multitude of available apps, features, and tasks, all specifically related to the window, file, or folder where that simple right-click took place.
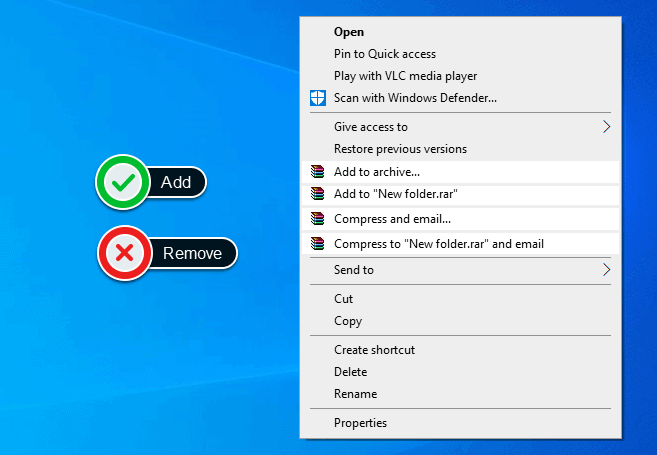
The Context Menu, commonly known as the Right-Click menu has a bunch of options which usually confuses the users. It is a cluster of multiple quick navigation options most of which we don’t usually require and if you want to know how to remove items from right-click menu in Windows 10 and how to add a program to the right-click context menu in Windows 10 then we are going to take a look at just that today.
So, without further ado, let’s begin and find out how to add items to the right-click menu and remove right-click context menu items in Windows 10 operating systems. Here we will be taking a look at a couple of methods that you can easily follow and customize right-click menu items.
Disclaimer: We advise extreme caution when editing the Windows Registry file. If you delete, edit or tweak any registry keys incorrectly, you could damage your Windows installation beyond repair. So, only proceed if you do know what you are doing exactly. Also, backup Windows 10 registry files and create a system restore point before you proceed.
How to Remove Items from Right-Click Context Menu in Windows 10
The right-click context menu is certainly the quickest way to navigate your way through Windows, but from time to time it contains too many unwanted items as well. However, you shouldn’t worry about the cluttered Right-click context menu too much because it’s easily customizable.
So if you want to edit and remove items from right-click menu in Windows 10 PC or laptop then follow these below explained steps. You can remove items from the right-click context menu using the Registry Editor. Here’s how:
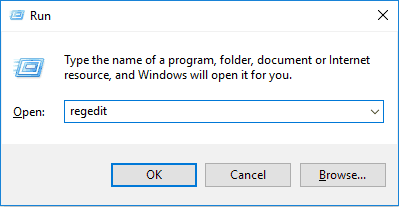
Step (1): At first, press Windows + R keys together and then type regedit in it and press the Enter key.
Step (2): Once the Registry Editor opens, navigate to the following registry key:
HKEY_CLASSES_ROOT*\shellex\ContextMenuHandlers\
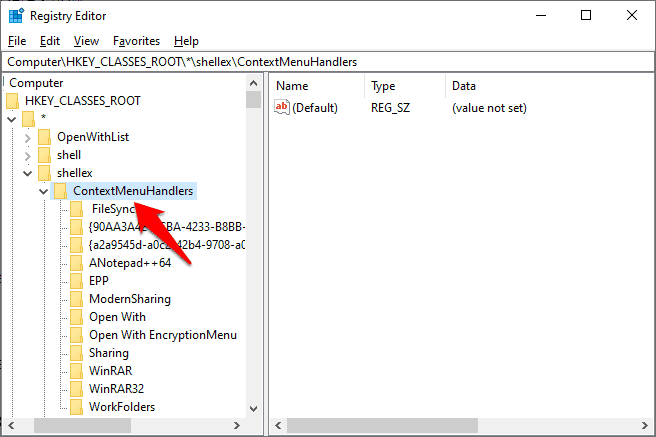
Step (3): After expanding the ContextMenuHandlers folder and you will see multiple options. From here, you can easily select the ones you want to remove. Do note that the program name in the right-click menu and the name in the registry won’t be the same and some trial and error may be required to find the exact menu you wish to remove.
For example, you can easily identify that here “Anotepad++64” entry is representing the “Edit with Notepad++” option in the right-click menu. However, you can’t easily identify that the “FileSyncEx” entry is representing the “OneDrive” option in the right-click menu.
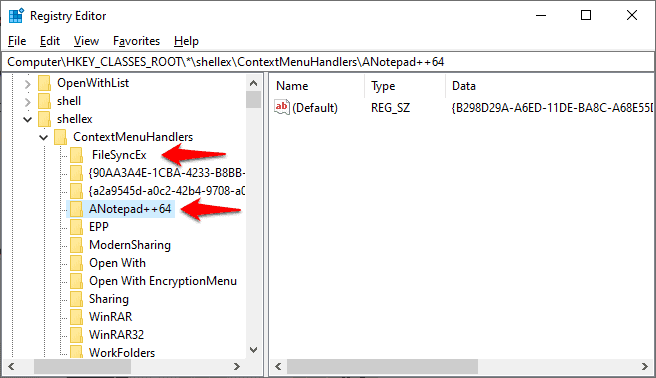
Step (4): To remove any such program to the right-click context menu, select the key folder, and then double click on the Default. Next In the value data, simply place a minus (–) sign in front of the value to make that entry inactive.
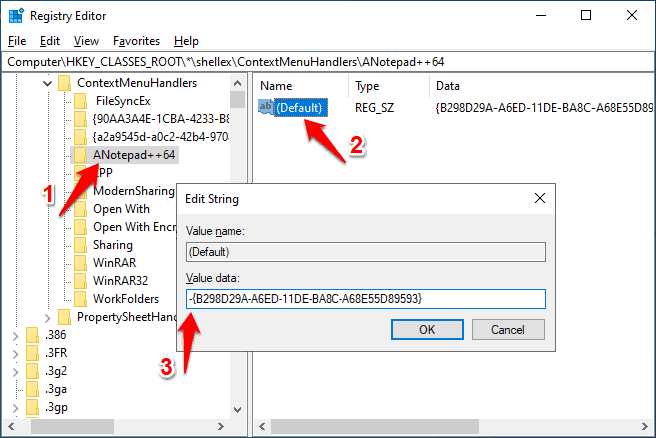
And in case, if you want to enable it again in the future, simply remove the minus (-) sign in front of the value and it will be active like before.
You can also delete the entry but I recommend you don’t do that. Because if you delete any a key then you won’t be able to revert it back again.
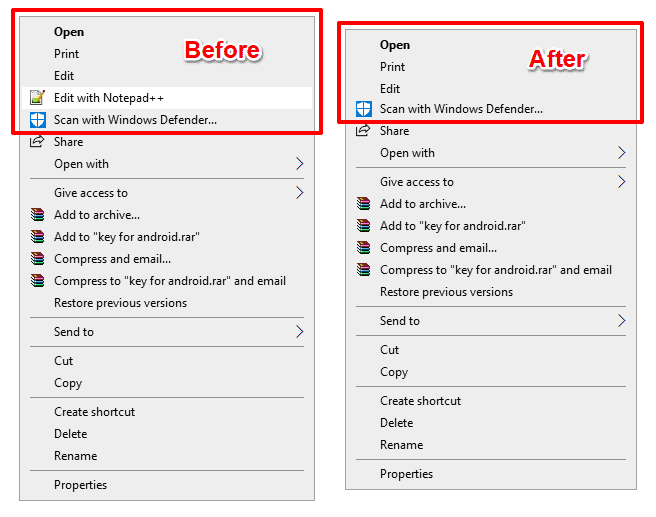
Important note: If the items you wish to remove from the right-click context menu in Windows 10 are unavailable in the path mentioned above then try navigating to these paths one by one:
- HKEY_CLASSES_ROOT\*\shell
- HKEY_CLASSES_ROOT\AllFileSystemObjects\ShellEx\ContextMenuHandlers
To customize the right-click context menu for folders:
- HKEY_CLASSES_ROOT\Folder\shellex\ContextMenuHandlers\
- HKEY_CLASSES_ROOT\Directory\shell
To customize the right-click context menu for desktop:
- HKEY_CLASSES_ROOT\Directory\Background\shell
- HKEY_CLASSES_ROOT\Directory\Background\shellex\ContextMenuHandlers
So this is how you can easily remove items from the right-click menu in Windows 10 and make your Windows right-click context menu clutter-free.
Learn: How to Fix Mouse Left Click acting Like Right Click in Windows 10
How to Add a Program to the Right-Click Menu in Windows 10
If you use any program very frequently, there is a high chance you would love to really add that item to the right-click context menu for faster access. Well, nothing is impossible in this case. Similar to removing items from the right-click menu, you can use the Windows Registry Editor to edit and add items to the context menu in Windows 10 operating systems.
Simply follow these below-given instructions and learn how to add a program to the right-click context menu in Windows 10 computer:
Simply follow these below-given instructions and learn how to add a program to the right-click context menu in Windows 10 computer:
Step (1): First of all, press Windows + R keys together and then type regedit in it and press the Enter key.

Step (2): Once the Registry Editor opens, navigate to the following registry key:
Computer\HKEY_CLASSES_ROOT\Directory\Background\shell
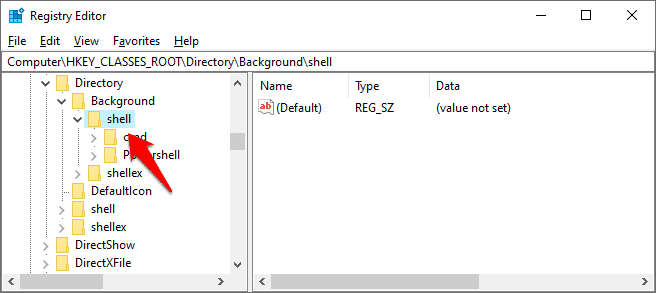
For example, here we are going to add the Calculator app (calc.exe) to the Windows 10 right-click context menu. You can add any program according to your need by following these steps.
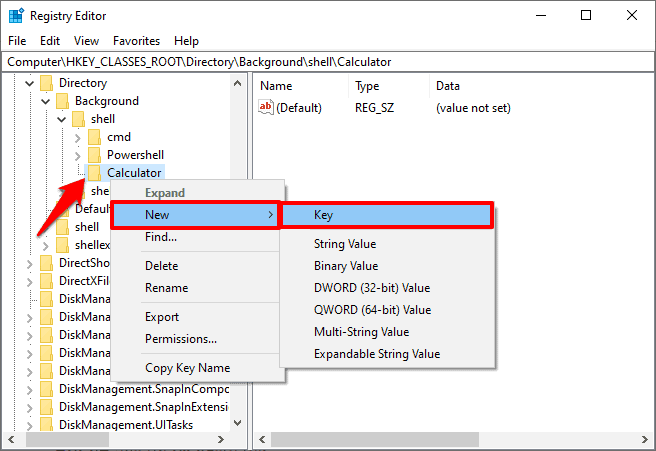
Step (3): Next, right-click on the “shell” folder and then select New > Key and give it the name of the program you want to add. Here we are adding the Calculator app.
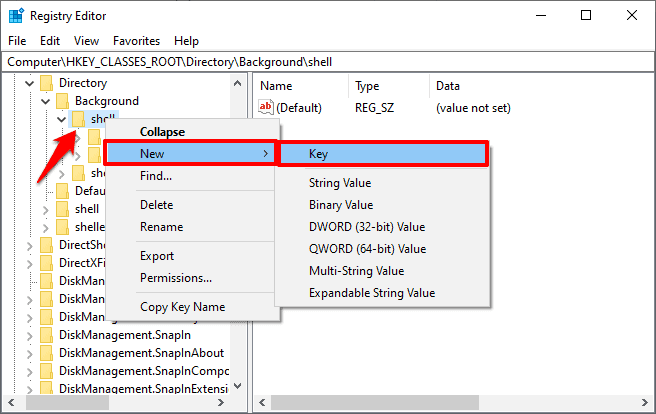
Step (4): After that, right-click on the Calculator key folder you just created and then select New > Key and give the new key the name “command“.
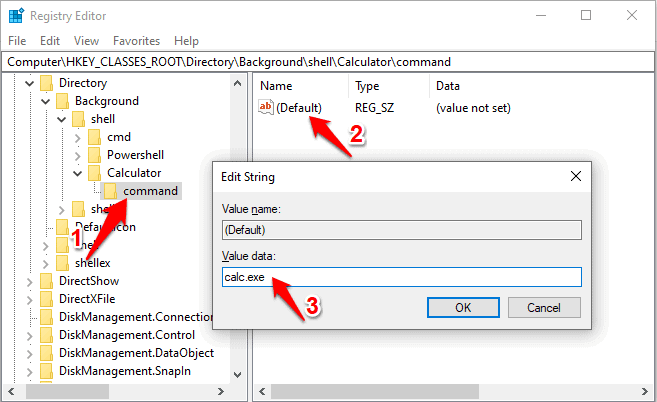
Step (5): Now, select the command folder and then double-click on the Default value in the right-hand pane. Next, type “calc.exe” into the Value data box and then click on the OK button to save the changes.
Once done, close the registry editor and right-click on the desktop to check if you were able to add a program to the right-click context menu.
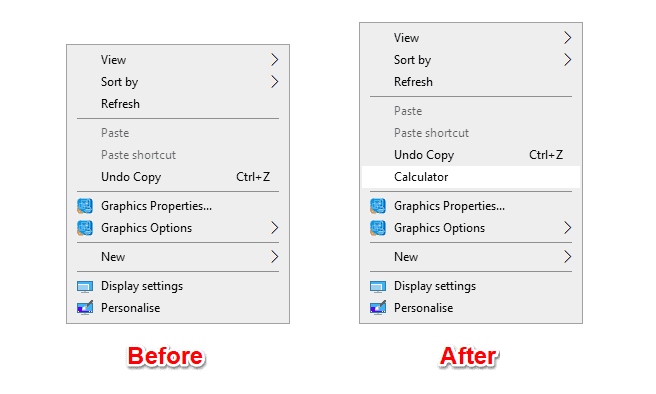
Thus, you can easily add any application to the Windows desktop right-click menu. Now whenever you right-click on your desktop, you will get the quick access to the programs you added this way.
Almost all the common Windows applications like Calculator (calc.exe), Notepad (notepad.exe), and Registry Editor (regedit.exe) work without adding the path location of the executable file because they are stored in the Windows/System32 directory. However, if you want to add applications outside the defined system path then you will have to add specific path information of the executable file.
Conclusions
We hope we were able to answer your questions, how to remove items from the right-click menu in Windows 10, and how to add a program to the right-click context menu using the Registry Editor?
If you have any more queries regarding changing the right-click context menu items or editing the Windows 10 context menu then feel free to comment down below and we shall certainly help you out.
You may also be interested in checking out:
- How to Burn CD or DVD in Windows 10 from Right-Click Menu
- How to Copy Text from Right Click Disabled Websites
- How to Enable Right-Click “Run as different user” in Windows 10
- How to Change Mouse from Double Click to Single Click in Windows 10
- How to Enable or Disable “Single-Click to Open an Item” in Windows 10