If you have installed recently launched Windows 10 operating system on your PC then you must have experienced one thing that whenever you insert a USB flash drive or CD/DVD etc into your computer, Window drive opens up automatically without asking for permission.
Basically, it happens due to the enabled AutoPlay functionality. AutoPlay feature in Windows 10 is provided to perform tasks quickly and without any delay but it might damage your system very badly by installing computer viruses and other malicious software.

In this condition, turning off AutoPlay in Windows 10 is one of the best solutions to protect your PC from the Virus/Malware Infection. Here’s the complete guide on – how to disable autoplay in Windows 10 PC.
See also: Turn ON or OFF Presentation Settings in Windows 7 or 8
Turn off AutoPlay in Windows 10
To turn off AutoPlay in Windows 10, you need to go for AutoPlay option. There are two quick ways of getting the AutoPlay option:
First, by typing AutoPlay in Search box from the Start Menu and the selecting the option of AutoPlay from search result. And second, through the option available in Control Panel. (In this guide, we are using second way).
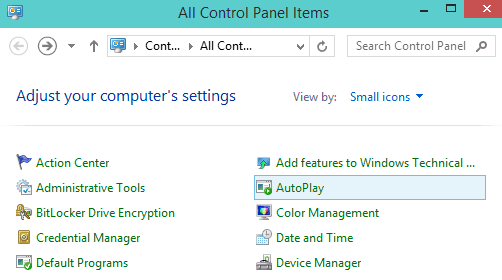
Step (1): First of all, open Control Panel on your Windows 10 PC.
Step (2): From the available options, click on AutoPlay option.
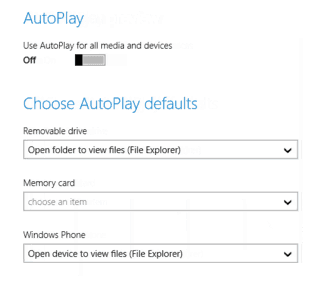
Step (3): After the click, AutoPlay setting page will appear on your computer screen.
Step (4): On the right pane of the AutoPlay setting page, you will see the slider option Use AutoPlay for all media and devices.
Step (5): You have to use the slider and turn it off to disable AutoPlay.
That’s it!
Thus, you can easily turn off AutoPlay on Windows 10 computers and protect them from viruses and other malicious software.
To grab more Windows 10 tips and tricks, click here…………..


Awesome article.
Thanks for sharing! 🙂
Hi Amit,
Indeed a helpful tutorial. The screenshots shared by you made it easier to understand.
Thanks for sharing 🙂