Do you want to stop Windows 11 from downloading and installing updates automatically? If yes, here’s how to turn off automatic updates on Windows 11 PC.
If you’re not a member of the Windows Insider Program and still have downloaded Windows 11 beta version from an unauthorized source and installed it on your system, then disabling Windows 11 auto update is the only way to use it on your PC without the required Windows product key. However, we don’t recommend downloading any file from an unauthorized source.
Since all the beta versions tend to be buggy, Microsoft will keep releasing updates to stabilize the Windows 11 operating system. Being a user-friendly OS, Windows enables the Automatic Update feature by default. But when your Windows 11 computer receives updates, you’ll need a product key to use it afterwards.
So if you want to disable Windows 11 auto update completely, check out this guide on how to turn off automatic updates on Windows 11 operating system. Here we have explained the 6 best methods in details that you can follow to stop automatic updates on Windows 11 laptops and desktop computers.
Let’s have a look at the best and most helpful ways to turn off automatic updates on Windows 11 systems.
How to Turn Off Automatic Updates on Windows 11
On June 24, 2021, Microsoft announced their latest version of Windows – Windows 11. And since then, a lot of speculations have been made about this newly designed Windows OS. But Windows 11 operating system is not yet released officially, so it’s not available for all users.
Only the Windows Insider Program members are eligible to install Windows 11 beta version. That’s why many users are running Windows 11 on their system through the ISO file. And if you’re also doing the same, you will have to disable Windows 11 automatic updates to keep it running smoothly.
Once you disable the automatic update completely, all the Windows 11 cumulative updates will be on halt and you will be able to use the installed beta version without any intruptions.
So now, without any further ado, let’s check out all the step by step methods and learn how to stop Windows 11 from downloading and installing updates automatically. Here we go:
Method 1: Pause Updates on Windows 11
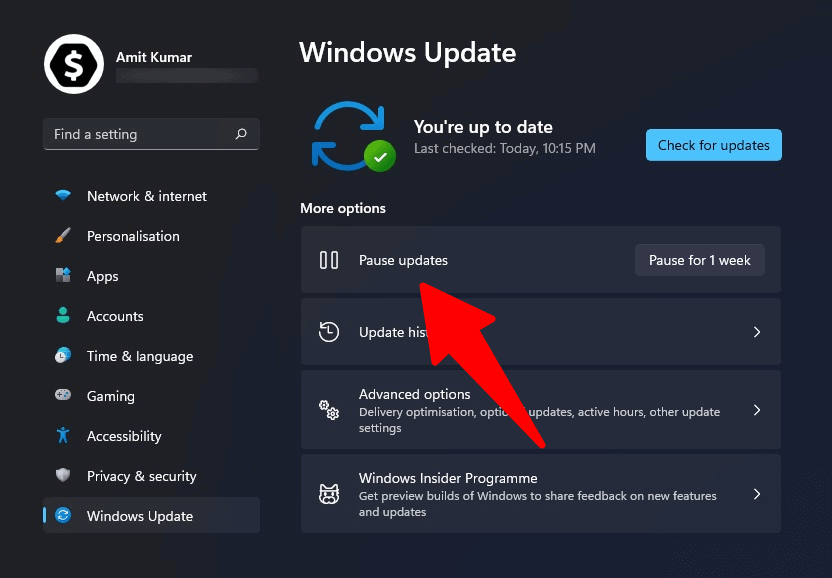
If you don’t want to disable Windows 11 auto update permanently, but pause for 1 week then pausing updates is the most suitable option for you.
Microsoft provides a “Pause updates” option in the Windows 11 update settings and from the name, you can understand it’s a temporary solution.
So, if you want to stop Windows 11 automatic updates for a week, then simply follow the below explained steps:
- At first, press Windows + I keys together on your keyboard to open the Settings.
- On the Settings window, click on the Windows Update menu.
- Now on the Windows Update section, click on the Pause for 1 week button which is loctaed under the More options.
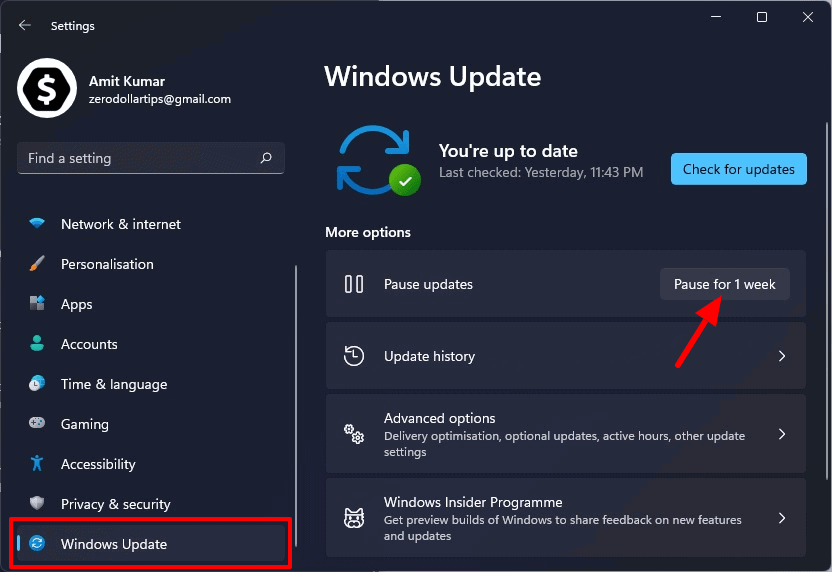
- That’s it! Now, close Settings window.
Now your Windows 11 computer will no longer download updates automatically for the next 7 days.
Method 2: Disable Windows Update Service on Windows 11
Disabling Windows update services is another quick way to turn off automatic updates on Windows 11 operating system. Doing so will completly disable Windows 11 auto update.
You can definitely update your PC manually or set it back to Automatic if required in future. Follow the steps below to perform this method:
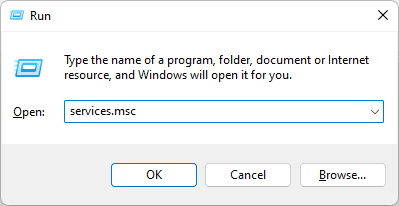
- Press the Windows + R keys together to open the Run dialog box.
- Next type “services.msc” within the Run dialog box and hit the Enter key.
- In the Services window, find Windows Update service and double-click on it.
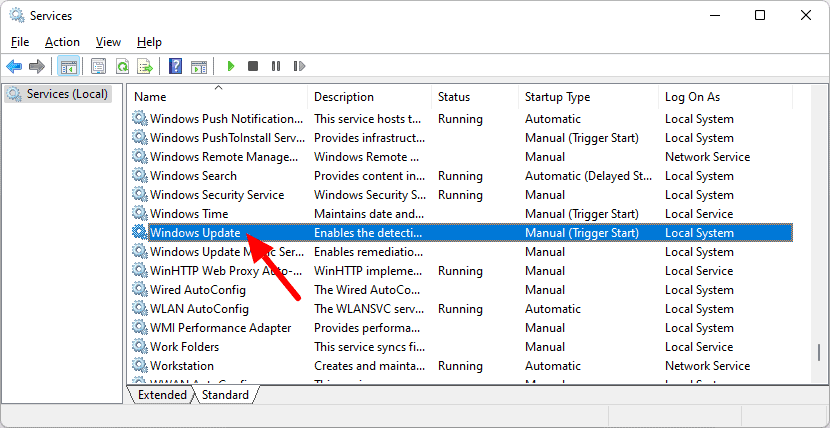
Note: The services will be listed in alphabetical order. So just keep scrolling until the Windows Update option comes.
- Now on the Windows Update Properties dialog box, go to the General tab.
- Next from the Startup type drop-down menu, select Disabled option.
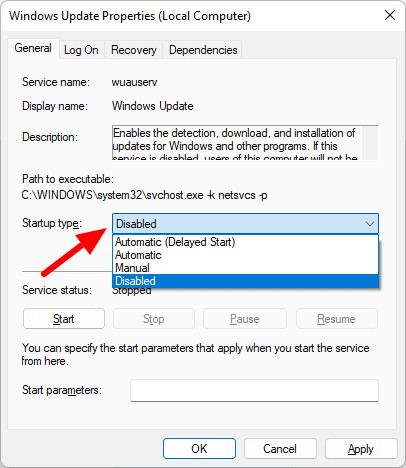
- Finally, click on the Apply and OK button to the save changes.
That’s it! Once you have disabled the Windows Update service, your Windows 11 laptop or desktop computer will no longer updated automatically.
Method 3: Set Up a Metered Connection on Windows 11
You probably know that Windows operating system doesn’t allow automatic updates when your system is connected to a metered connection. Since Microsoft rolls out larger update versions for their existing OS, updating through a metered connection can consume huge amounts of data. That’s why Windows 11 auto-update is turned off by default in this case.
So, if you set your WiFi or Ethernet connection as metered on your PC, it will automatically disable Windows 11 updates. But yes, if you want then you can manually update your operating system even when connected to a metered connection.
The best part is, you can set multiple network sources as metered connections on your Windows PC. Hence you can easily turn off Windows 11 auto updates even when connected to a different network (other than the one you generally use).
Before you do so, make sure the default settings are not changed on your Windows 11 PC. To confirm that, follow this path; go to the “Settings > Windows Update > Advanced Options“. Under Advanced Options, ensure the “Download updates over metered connections” bar is toggled off.
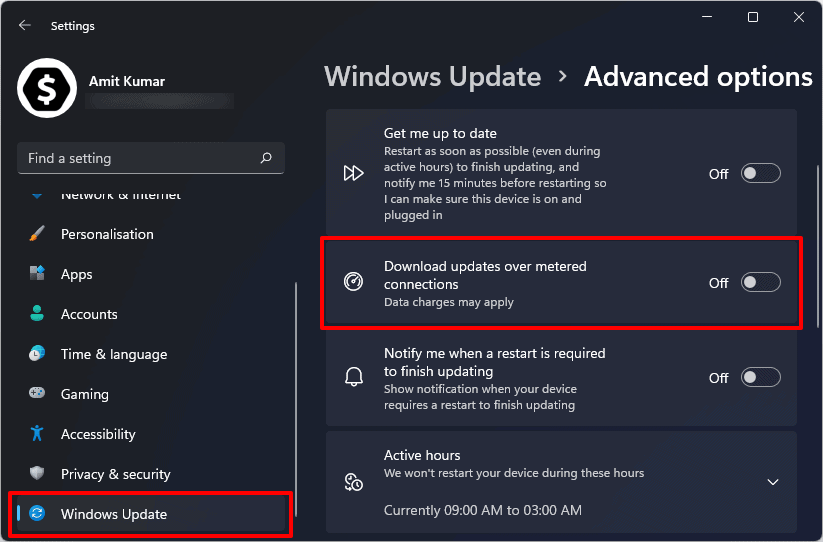
Once you are assured that the settings for downloading updates over metered connections is turned Off, follow these steps to set up a metered connection in Windows 11 PC. Here we go:
- Press Windows + I keys together to open the Settings.
- On the Settings window, click on the Network & Internet option.
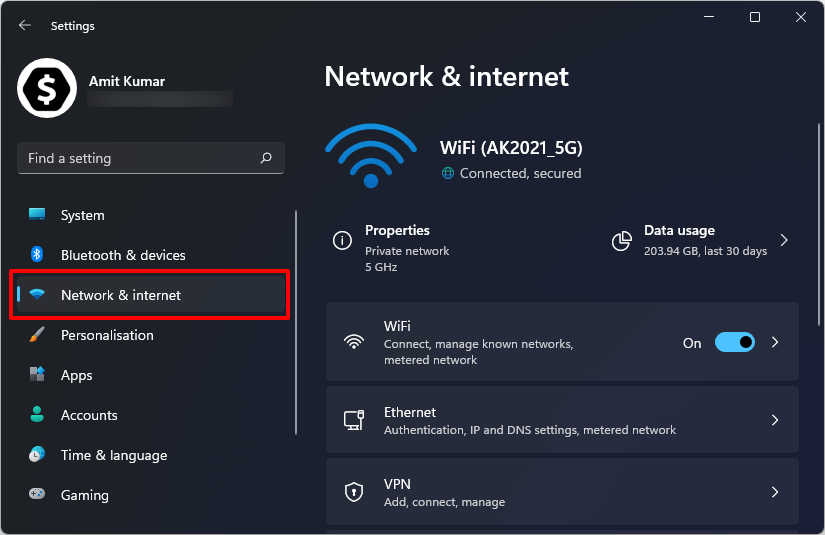
- In the next window, your WiFi or Ethernet status will be visible, depending on what network your PC is connected to.
- Now click on the “Properties” option, given right next to your network connection name.
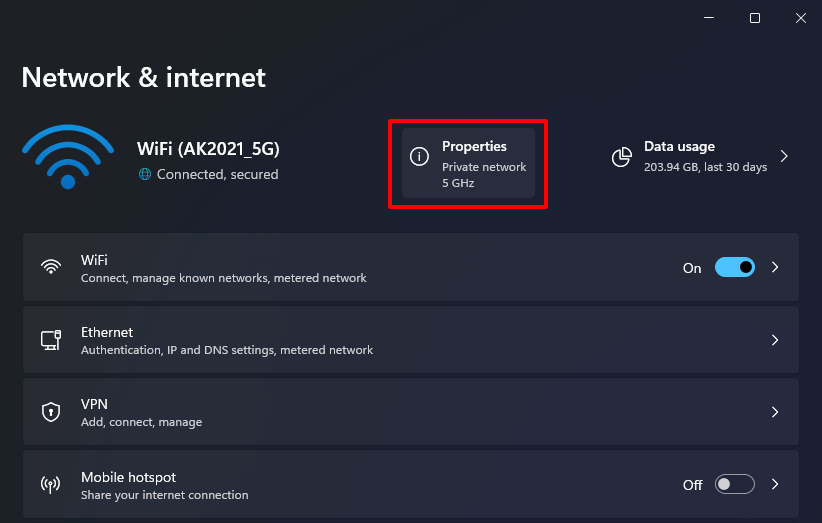
- In the next window, scroll down and turn On the toggle bar under the “Metered connection” section.
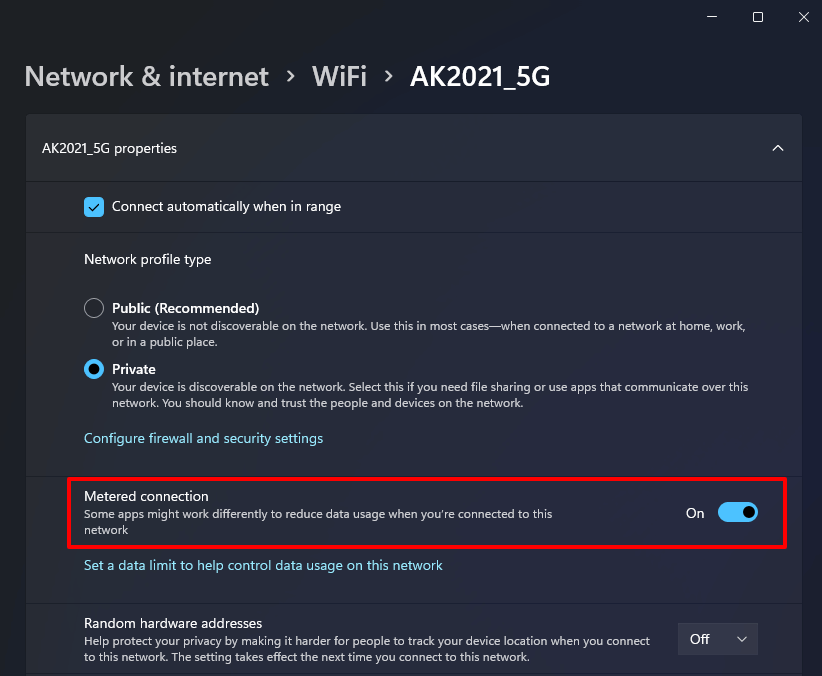
- That’s it! Now, you can close the Settings window.
Once you set up the metered connection this way, the automatic updates on your system will be completely restricted .
Method 4: Turn Off Automatic Updates on Windows 11 Using Registry Editor
If you’re looking for a little advanced method to turn off automatic updates on Windows 11, check this one out. It requires you to make changes in your Registry Editor to disable Windows 11 auto update permanently.
However, we recommend that before proceeding with the following steps, create and enable a System Restore point to prevent data loss. Once done, you’re good to go with the below-mentioned steps.
Here we go:
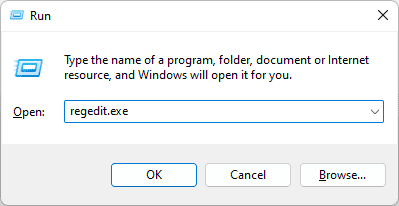
- Press the Windows + R keys together to open the Run dialog box.
- Next type in “regedit.exe” within the Run dialog box and hit the Enter key.
- In the Registry Editor window, navigate to the following path:
HKEY_LOCAL_MACHINE\SOFTWARE\Policies\Microsoft\Windows\WindowsUpdate
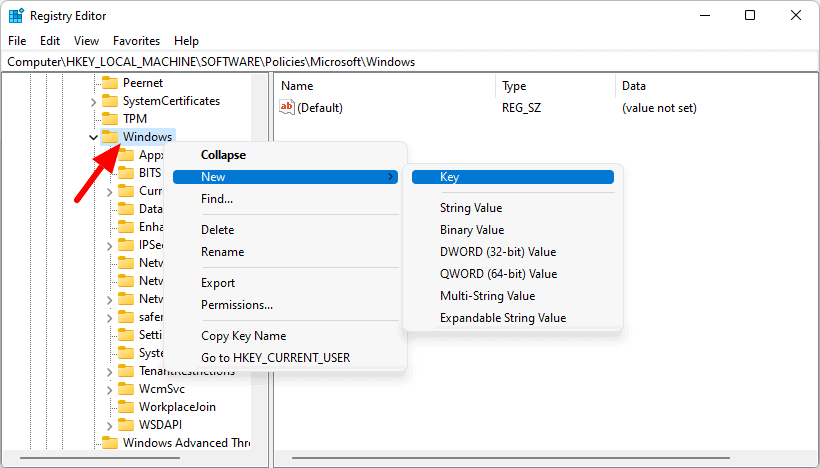
- If the WindowsUpdate key does not exist already, you will have to create the key. And to do so, right-click on the Windows folder and choose “New > Key” option.
- And then rename the folder as WindowsUpdate.
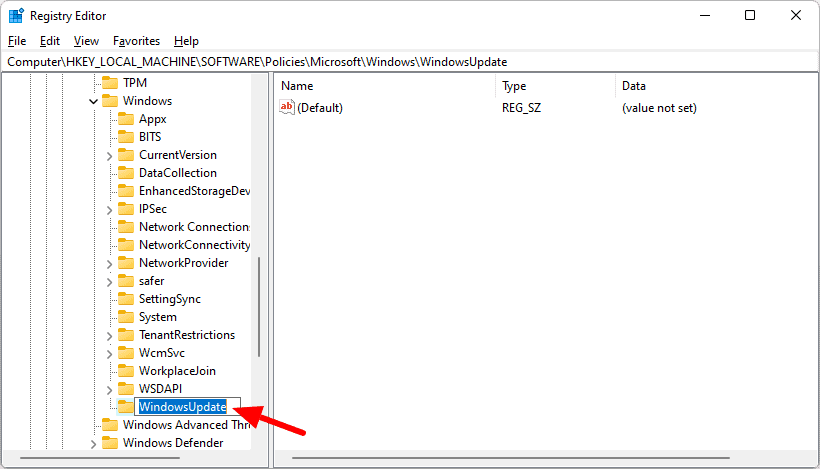
- Now under the WindowsUpdate key, you should find an entry “AU” from the same left pane.
- And if “AU” doesn’t exist already, create it by right clicking on the WindowsUpdate and then selecting New > Key option, and renaming the folder as AU.
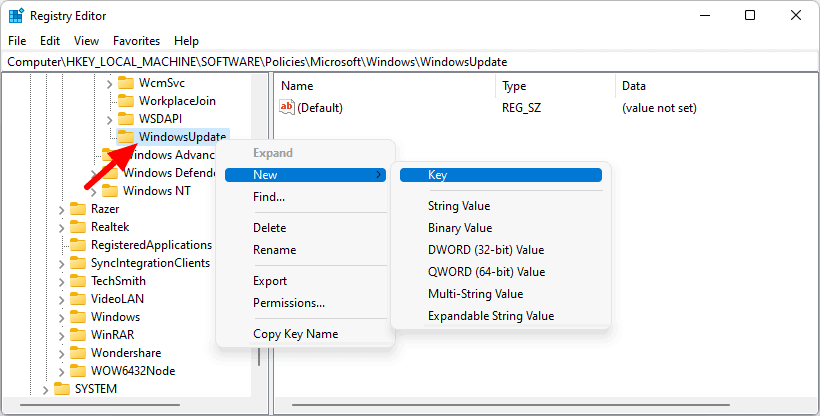
- Now right-click on the AU and choose “New > DWORD (32-bit value)” from the pop-up menus.
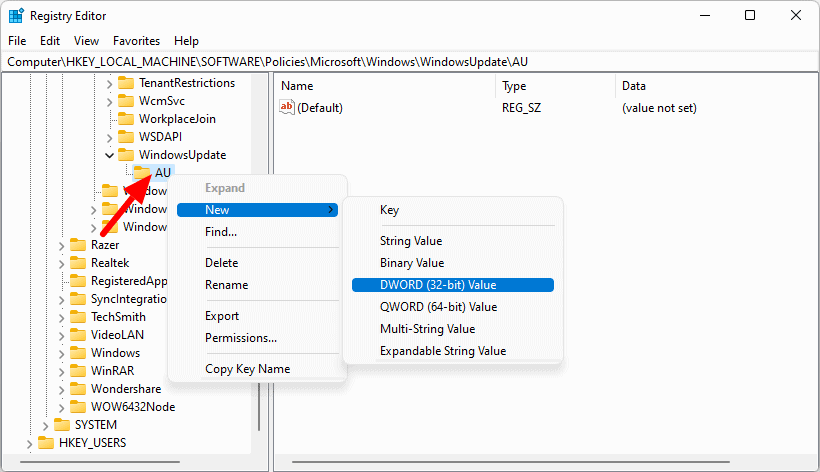
- And then name this entry as “NoAutoUpdate“.
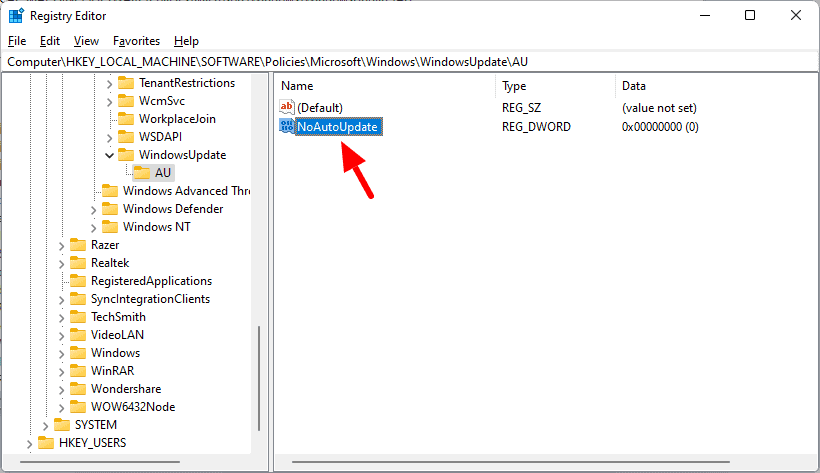
- Next, double click on the NoAutoUpdate, change the value data of this newly-created DWORD from 0 to 1.
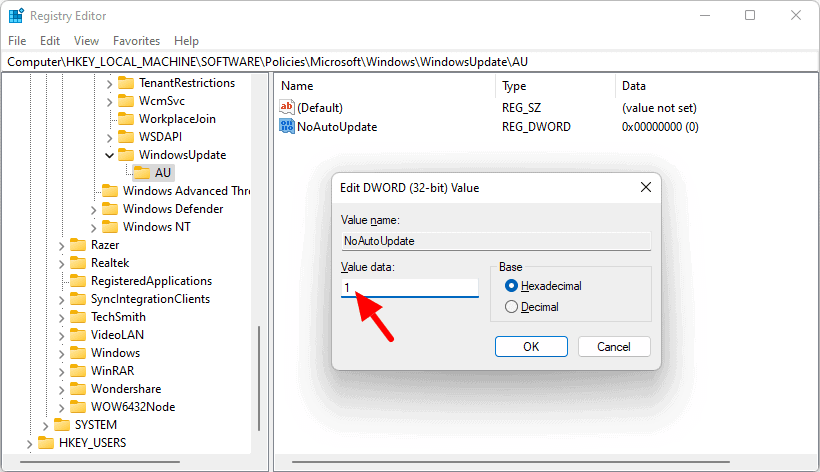
- Finally, click on the OK button to save the changes, and then close the Registry Editor. That’s it!
Enabling the NoAutoUpdate key in the Windows registry editor will turn off automatic updates on your Windows 11 system instantly. And if you want to enable the automatic updates again in the future, simply delete the WindowsUpdate key in the Registry Editor, and restart your PC.
Method 5: Disable Automatic Updates on Windows 11 Using Group Policy Editor
Microsoft offers different system tools to let the users perform certain tasks. Local Group Policy Editor is one such system tool. But, this one is not available or enabled in every version of Windows.
Yes, it’s true! The Microsoft Windows Home Edition or Student Edition doesn’t come with Group Policy Editor enabled. So, before you proceed with the below-mentioned steps, ensure that Group Policy Editor is enabled on your system. If not, you can search the web to know how to enable local group policy editor in Windows 11 PC.
So, if your Windows operating system has Group Policy setup on it then check out the below explained process now to understand how to turn off automatic updates on Windows 11 using the Local Group Policy Editor. Here we go:
- Press the Windows + R keys together to open the Run dialog box.
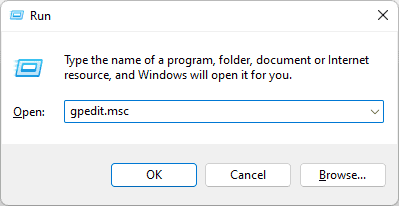
- Next, type in “gpedit.msc” and hit the Enter key to open the Group Policy Editor.
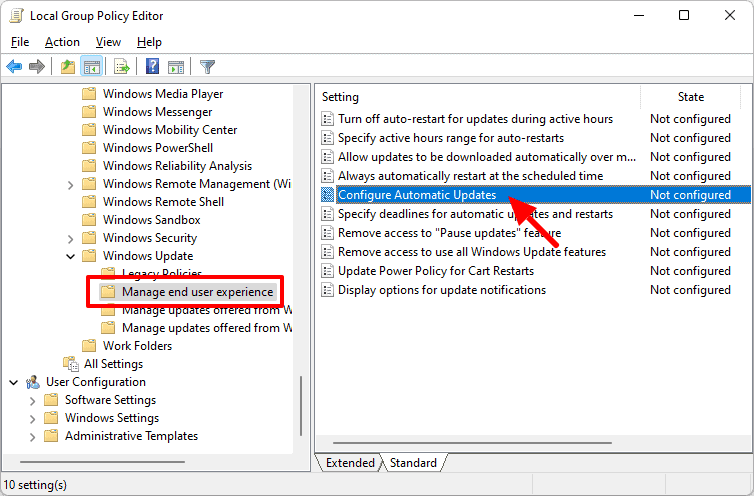
- In the Local Group Policy Editor window, navigate to the following path:
Computer Configuration > Administrative Templates > Windows Components > Windows Update > Manage end-user experience
- Now from the right pane, double click on the “Configure Windows Update” settings.
- Next on the Configure Automatic Updates window, select the “Disabled” option.
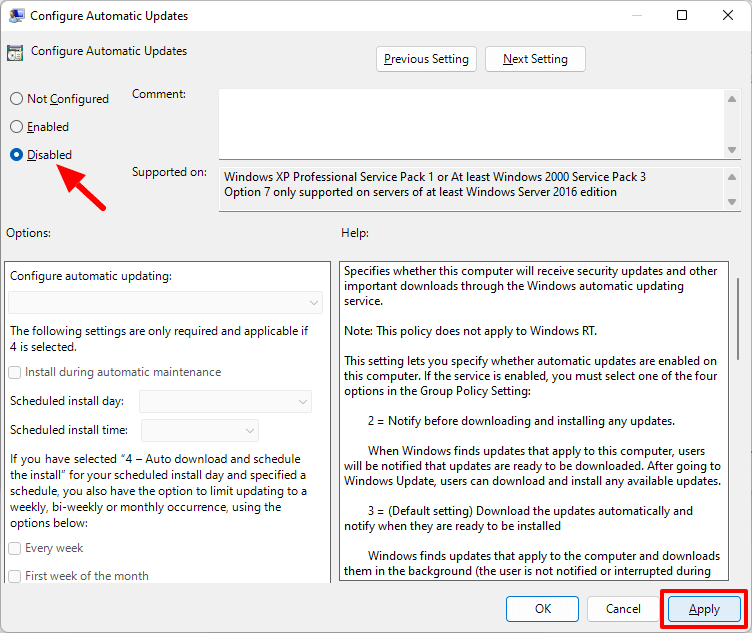
- Once done, finally click on the Apply and OK button to save the changes.
When the Configure Automatic Updates policy is set to “Disabled”, any available Windows updates can be downloaded and installed manually only. This is how you can easily stop updates installing automatically on Windows 11 computers.
Method 6: Disable Windows 11 Auto Update using Windows Update Blocker
If you feel the built-in tools and settings are not so helpful or easy to tinker with then you should use a third-party software that allows you to have control over automatic Windows 11 updates.
Windows Update Blocker is such an amazing, portable freeware for Windows operating system that helps you to completely disable or enable automatic updates on your Windows 11 operating system in just a few simple clicks.
Here is how to turn off automatic updates in Windows 11 using the Windows Update Blocker software:
- At first, download and install Windows Update Blocker on your computer.
- Once the software is installed, launch it and select the Disable Updates and Protect Services Settings options.
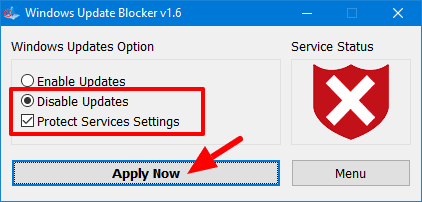
- Finally, press the Apply Now button to block the automatic Windows updates.
Note: The Service Status icon will turn red once the changes get applied. You can re-enable it by ticking the “Enable Updates” box anytime.
How to Stop Automatic Updates on Windows 11 Operating System
Many Windows users feel that automatic updates are quite annoying and not extremly important in some cases, and if you also feel the same then these are the methods you must try to disable Windows 11 auto update completely.
If you think making cahnges in the Windows Registry Editor or Local Group Policy Editor is a complex job, try using the third-party software (Windows Update Blocker) or other quick ways to turn off automatic updates on Windows 11 that we have explained above.
In my opinion, you should always keep your system up-to-date and activate Windows 11 to enjoy all the amazing features of Windows 11 operating system. So, we recommend you not to stop Windows 11 from downloading and installing updates automatically because it will make your operating system more stabilized.
We hope you found this guide “how to turn off automatic updates on Windows 11 operating system” helpful for you. If yes, please feel free to let us know your opinion. Also if you have any other queries related to Windows 11 update, drop a comment in the below box. We would be happy to help you!
You may also be interested in checking out:
- How to Password Protect a Folder in Windows 11 without Software
- How to Always Open Chrome in Incognito Mode on Windows 11
- How to Stop Windows 10 Update from Installing Updates Automatically
- How to Disable Automatic Restart in Windows 10 after Updates Installation
- How to Automatically Clear Browsing History in Chrome on Exit