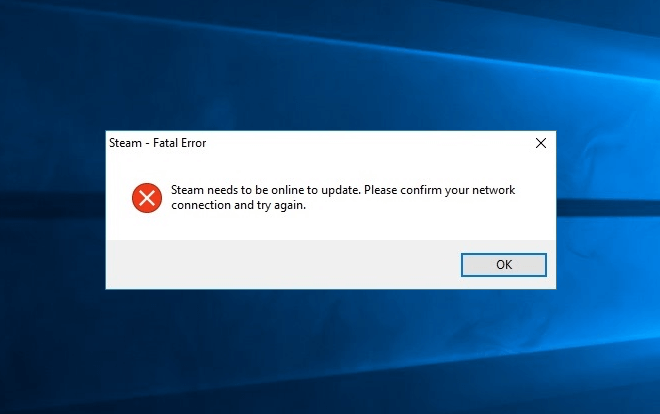
Learn how to fix “Steam needs to be online to update. Please confirm your network connection and try again.” fatal error while updating Steam on Windows 10 PC.
Steam needs to be online to update fatal error might annoy you a lot if you are facing this Steam update issue very frequently.
If you are a passionate gamer, you might be familiar with Steam software at some point.
Steam is an ultimate online game platform and social entertainment platform designed by the Valve Corporation, which provides digital rights management (DRM), multiplayer gaming, video streaming and various social networking services. Steam ensures the instant access to more than 1,800 game titles and connects its 35 million active users to each other very efficiently.
With the help of this digital distribution platform, you can easily download all newly released games, play games online in the multiplayer mode and much more.
It doesn’t matter whether you’re using Windows PC, Mac, Linux box, mobile device, or even your television, you can enjoy the benefits of Steam anywhere.
Steam is having a dedicated team of developers who constantly work on the application in order to ensure that the best features are provided to gamers and an unbeatable gaming experience is delivered. In order to enjoy the latest features developed by the Steam team, you need to update Steam software to the latest version.
According to some of Windows users, it is also possible that you run across “Steam needs to be online to update. Please confirm your network connection and try again.” fatal error when you are trying to update the Steam application to new version available.
Sometimes, you might come across Steam needs to be online to update Windows 10 error even if you are having a working internet connection.
Addition to this, Steam fatal error will also restrict the normal functioning of the application and won’t allow you to download any game or play it on your Windows 10 PC.
In order to resolve this Steam update issue, firstly you will have to find the actual culprit due to which the Steam fatal error needs to be online to update is being appeared.
How to Fix Steam needs to be online to update Error in Windows 10
Frankly speaking, there are no specific reasons which cause “Steam needs to be online to update” error on Windows 10 computer. Sometimes, it might appear due to Steam crash or damaged Steam files and sometimes, it happens due to another problem in the system (Steam fatal error on startup).
But one thing’s for sure, Steam fatal error will prevent you from playing your favorite games and downloading new games on your PC. But fortunately, there are few very helpful solutions available which will work perfectly on all versions of Windows 10.
Here, we have compiled some of the best Steam needs to be online to update Windows 10 solutions which you can try out to get rid of this frustrating error. Let’s dive in.
Method 1: Run Steam as Administrator
If you are not opening Steam software with administrator rights then it is possible that it throws you Steam needs to be online to update error. So before following any other solution, you should try running Steam with administrator privileges first. Here’s how to run Steam as administrator in Windows 10 PC:
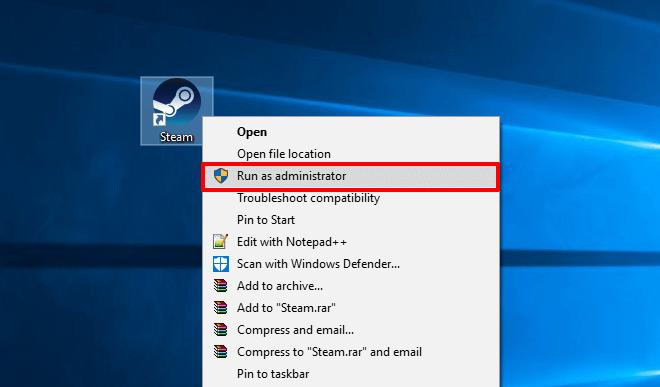
First of all, right-click on the Steam shortcut and then select Run as administrator option to open Steam software with admin rights.
If the running Steam with administrator privileges worked for you then you should always run Steam as the administrator in Windows 10 PC. To do so:
At first, right-click on the Steam shortcut on your desktop and then select Properties option.
On Steam Properties dialog box, go to Compatibility tab and then check Run this program as an administrator box.
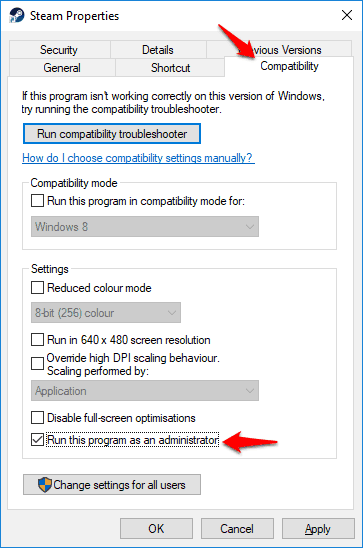
Finally, click on the Apply and then OK button to save the changes.
Now, Steam software will always be opened with the administrator privileges whenever you click on the Steam shortcut icon.
Running the Steam application with Admin rights should solve the Steam update issue on your Windows 10 computer. However, if you are still experiencing Steam – fatal error then you should follow methods explained below.
Method 2: Turn Off Windows Firewall
We all know that Windows Firewall is an important component of Microsoft Windows which ensures that network is safe and secure from attacks and hackers but by turning off Windows firewall for a while we can confirm if Firewall is blocking the Steam application or not.
Important note: You should always run Windows Firewall, turning off Windows Firewall might make your device more vulnerable to unauthorized access. Here, we are turning off Windows Firewall for testing purpose only.
Here’s how to turn off Windows Firewall in Windows 10 using Control Panel:
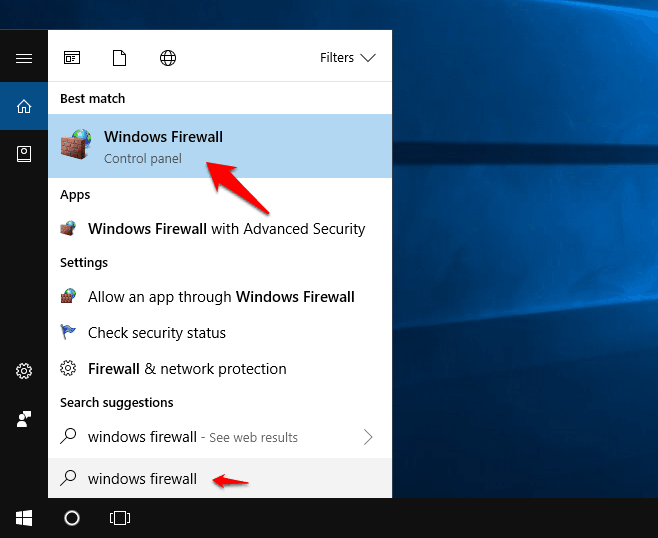
Step (1): At first, type Windows firewall in the Start search box and then click on the Windows Firewall search result.
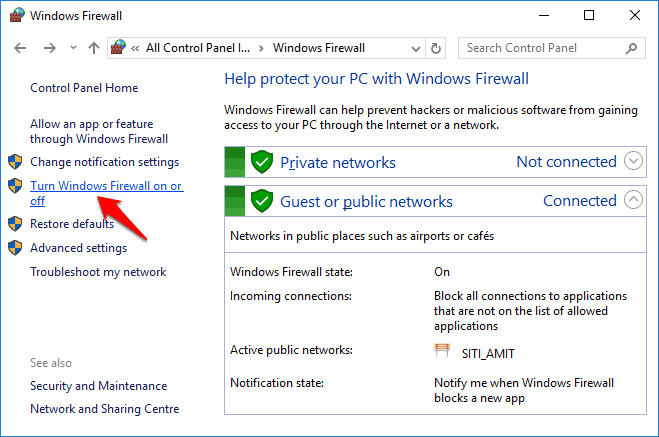
Step (2): From the left side menu on Windows Firewall window, click on the Turn Windows Firewall on or off option.
Step (3): Now on the Customise Settings window, select Turn off Windows Firewall (not recommended) option for both Private network settings and Public network settings.
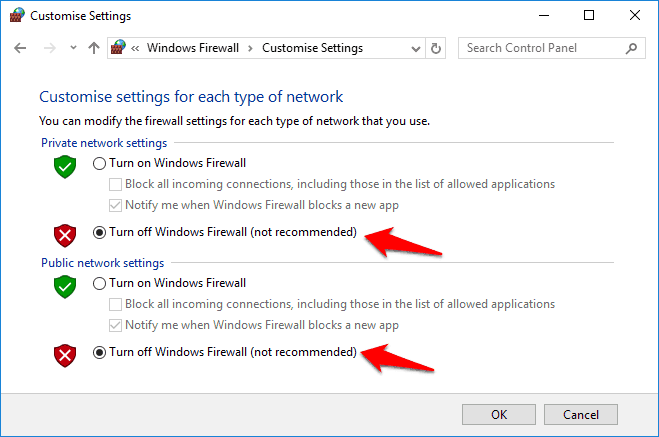
Step (4): Finally, click on the OK button to save the settings.
After disabling Windows firewall for both network settings (Private and Public), try opening Steam program.
If you are able to use the Steam application without receiving “Steam needs to be online to update. Please confirm your network connection and try again.” fatal error, it means that the Windows firewall is blocking the Steam software.
In this case, you can make changes to the outbound rules or simply use another firewall software on your system. Make sure that you enable Windows Firewall back on after making changes, or even if you have another firewall turned on.
Method 3: Restart Steam Client Service
Restarting Steam Client Service is also one of the most useful methods which you can try in order to fix fatal error Steam needs to be online to update on Windows 10 PC. Steam client service reboot will help you in getting back the normal state of the Steam application.
Here’s how to restart Steam Client Service in Windows 10 operating system:
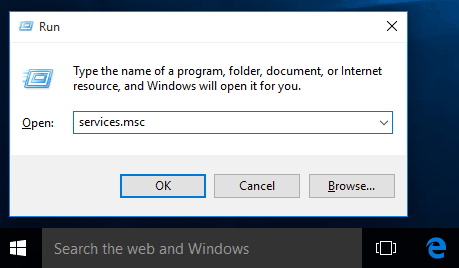
Step (1): Firstly, press Windows + R keys together to open Run dialog-box and then type services.msc in it. Finally, click on OK button.
Step (2): On the Services window, right-click on the Steam Client Service and then select Start option.
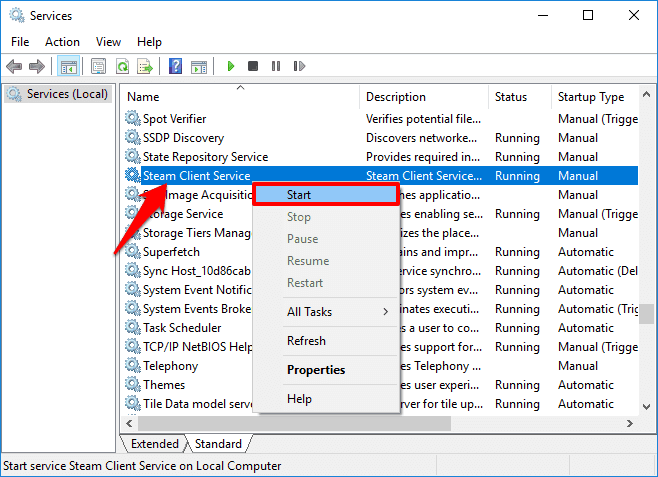
Step (3): In case the Steam Client Service is already started then try to Restart it.
Once you have successfully rebooted the Steam client service, try launching Steam on your computer to check and see if the Steam fatal error still persists.
Method 4: Uninstall Steam and Re-install it
Many Windows users have reported that they were able to resolve the Steam needs to be online error which they were getting before after reinstalling Steam program. Follow the steps mentioned below to uninstall Steam on Windows 10 computer and install it again:
Step (1): First of all, open Control Panel and then click on Programs > Programs and Features option.
Step (2): From the list of installed programs, right-click on Steam and then select Uninstall option.
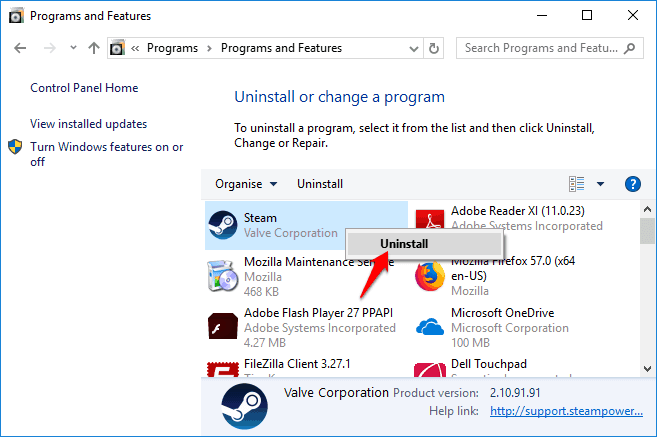
Once the uninstallation is completed, Steam will be removed from your Windows 10 PC.
You can also uninstall Steam software by going to Windows 10 Settings > Apps > Apps & features and then selecting Steam and clicking on Uninstall button.
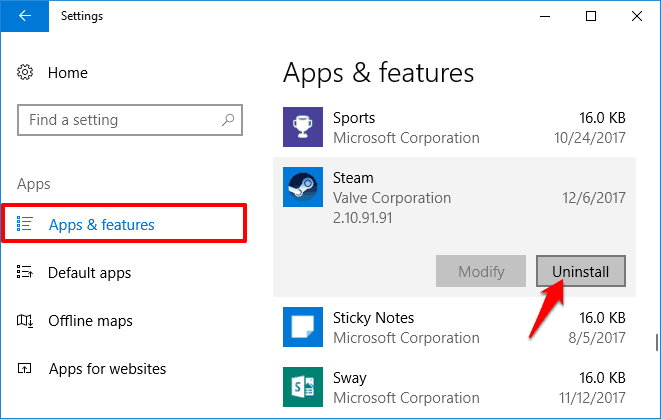
After the Steam application is uninstalled from your Windows 10 PC, go to the official website of Steam Software and then download and install Steam back again.
Method 5: Use the Portable Version of Steam
Sometimes, it is possible that you have not installed Steam properly on your system which is why you are getting Steam fatal error – Steam needs to be online to update. Please confirm your network connection and try again. continuously. In this situation, you can copy Steam files from another computer where the Steam application is working properly or you can download and use the Portable version.
If the Steam software which your friend is using is working fine then you can follow the below mentioned steps to fix Steam update error on Windows 10 PC very conveniently. Here’s how:
Step (1): At first, connect USB Drive or external Hard Drive to your friend’s system or another computer where the Steam is working properly.
Step (2): Now open Steam directory (C:\Program Files\Steam) and copy everything available in this folder except Steamapps and paste them on your Drive.
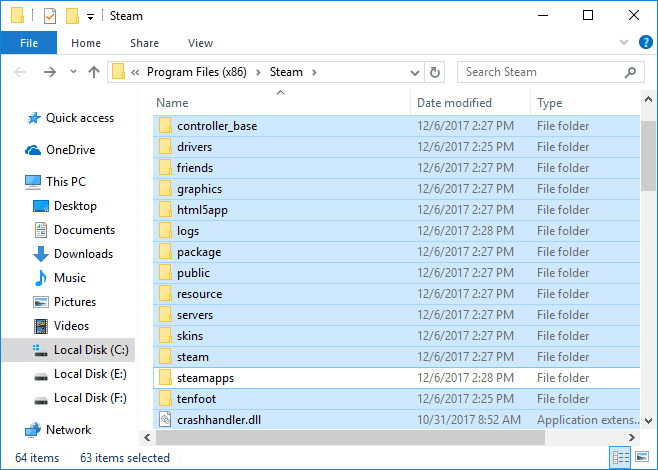
Step (3): Once you have copied the Steam files, now connect the USB drive or external Hard Drive to your system and paste all the copied content on your Steam installation directory.
Step (4): If you are warned to overwrite the files, click on Yes to overwrite everything.
Now try running Steam app to see if the error is solved now. This method has helped many people and fixed Steam needs to be online to update Windows 10 issue.
Method 6: Fix Steam Fatal Error using Registry Editor
In such cases, making few changes in the Steam registry settings might help you a lot. Follow the below instructed steps to fix Steam update error using Registry Editor:
Step (1): At first, press Windows + R keys together to open Run dialog-box and then type regedit in it. Finally, click on OK button.
Step (2): Once you are on Registry Editor, navigate to the following registry key:
HKEY_CURRENT_USER > Software > Valve > Steam
Step (3): On the right pane of Registry Editor, open AlreadyRetiredOfflineMode key by double-clicking on it and set its Value Data to 0 and then click on OK button.
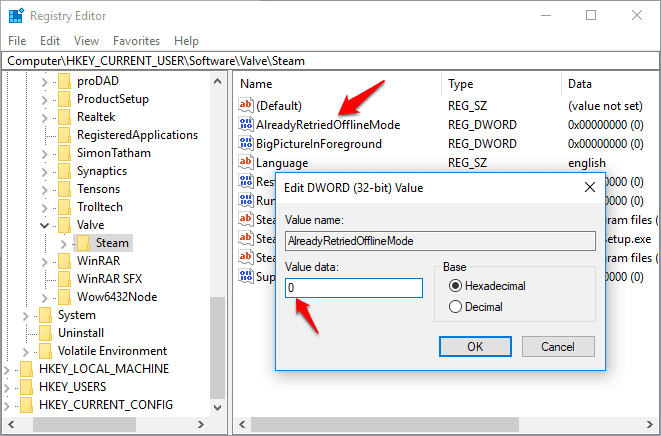
Step (4): Once you have made the changes, close Registry Editor and restart your computer.
Now you shouldn’t get the fatal error Steam needs to be online to update in Windows 10 operating system and should be able to download and play games using Steam without any interruptions.
Method 7: Add -tcp Parameter to Steam Shortcut
According to some expert Windows 10 users, adding -tcp parameter to Steam shortcut helps in getting rid of Steam fatal error needs to be online to update within seconds. Here’s how to add -tcp parameter to Steam shortcut in Windows 10 PC:
Step (1): First of all, right-click on the Steam shortcut and then select Properties option.
Step (2): On Steam Properties dialog box, go to Shortcut tab and then add -tcp right after quotation marks in the Target: section.
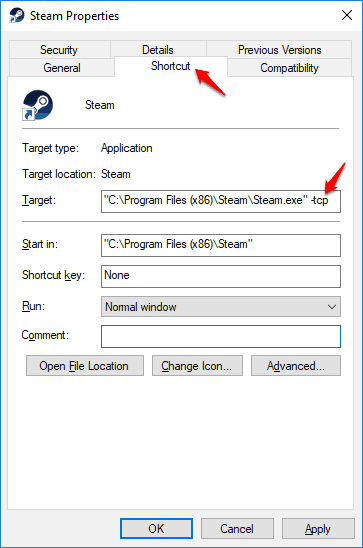
Step (3): Finally, click on the Apply and OK button to save the changes.
Now you can try to update Steam program. Making changes to the Steam shortcut should resolve the issue. However, if you are still not able to fix Steam update problem then follow the next solution.
Method 8: Disable Proxy Settings in Internet Explorer
You can also try disabling Proxy server settings as it is possible that Proxy is getting blocked by the Steam Servers. If you turn off Proxy settings in Internet Explorer then it will take effect on all the browsers which you are using on your system.
Here’s how to disable Proxy Settings in Internet Explorer on Windows 10 computer:
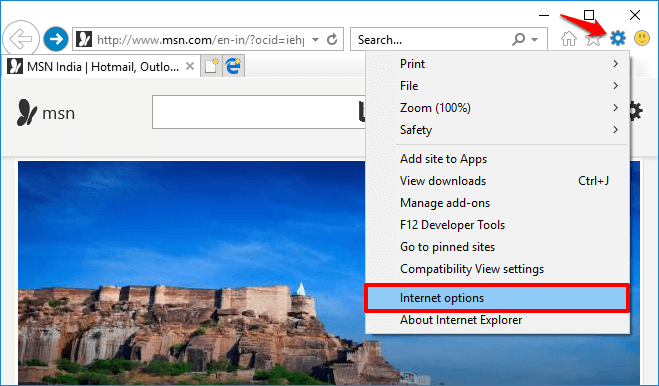
Step (1): At first, open Internet Explorer and click on the gear icon which is located at the top right corner and then select the Internet Options option.
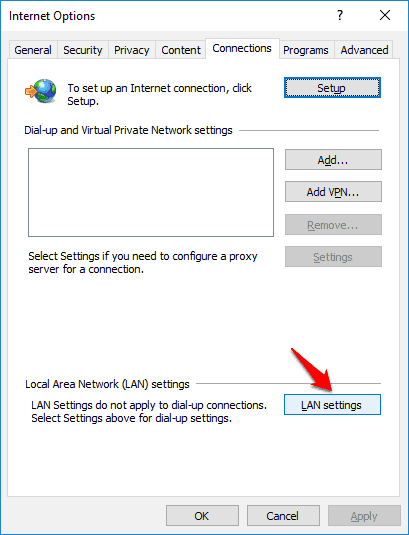
Step (2): On the Internet Options dialog box, go to the Connections tab and then click on LAN settings button.
Step (3): Next, check “Automatically detect settings” option and uncheck “Use a proxy server for your LAN (These settings will not apply to dial up or VPN connections).” option.
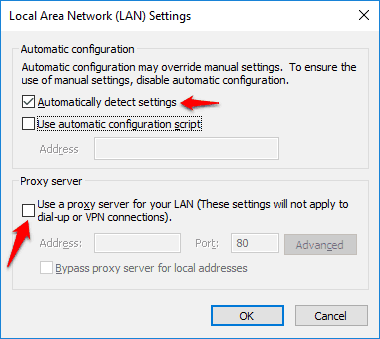
Step (4): Finally, click on OK button and then restart your Windows 10 computer.
This Steam needs to be online to update Windows 10 fix should work. Try updating Steam now.
Method 9: Change DNS Settings
Sometimes, Steam fatal error appears frequently due to the conflict with DNS settings. In such case, configuring your network settings to use Google Public DNS is the best choice. You should always use Google DNS servers as it is the most preferred and one of the fastest DNS servers which are used by the millions of people across the globe.
Here’s how to change DNS settings in Windows 10 and use Google Public DNS:
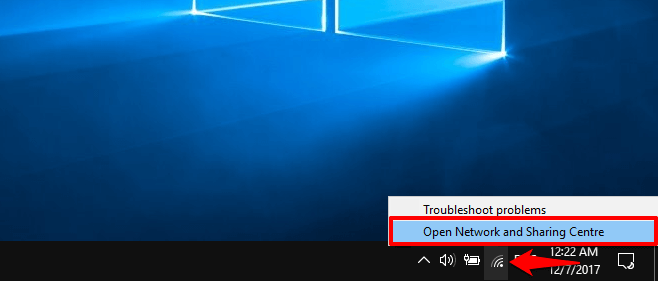
Step (1): First of all, right-click on the Internet or WiFi icon which is located on your Windows 10 taskbar and then select “Open Network and Sharing Centre” option.
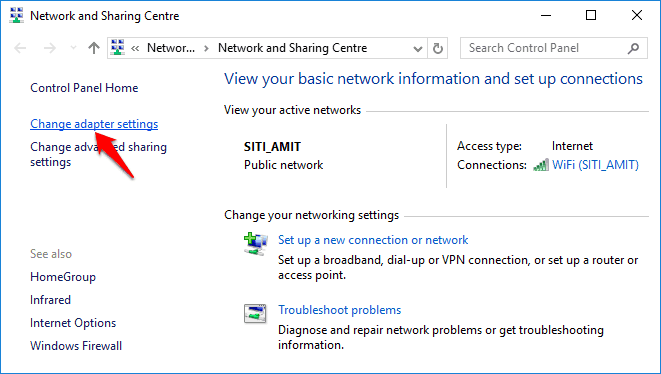
Step (2): On the Network and Sharing Centre window, click on Change adapter settings option.
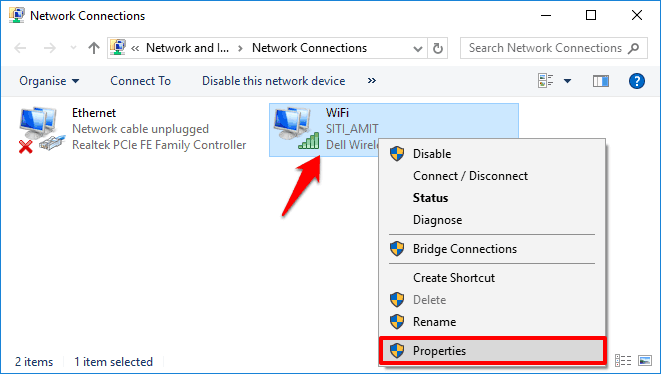
Step (3): Next, right-click on the network adapter which you are using currently and then Properties option.
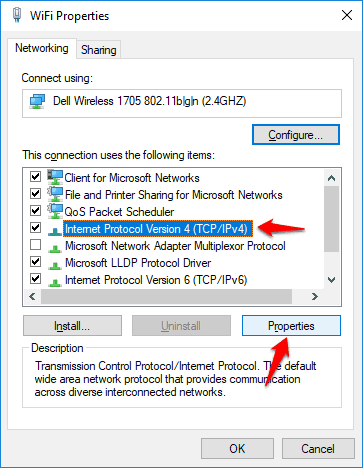
Step (4): On the Networking tab, select Internet Protocol Version 4 (TCP/IPv4) option and then click on Properties button.
Step (5): Next, select Use the following DNS server addresses: section and put in 8.8.8.8 and 8.8.4.4 as Primary and Secondary DNS Server.
Primary DNS Server: 8.8.8.8
Secondary DNS Server: 8.8.4.4
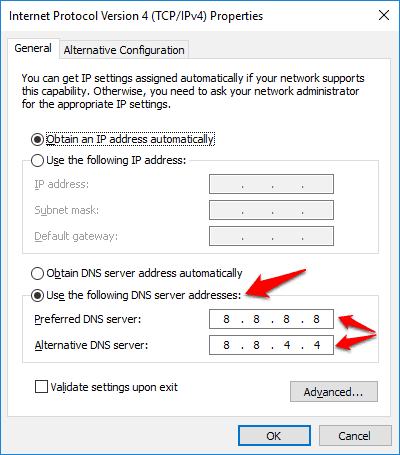
Step (6): Finally, click on OK button to save the changes and then restart your PC.
Once you change DNS settings in Windows 10 and started using the IP addresses 8.8.8.8 and 8.8.4.4 as your DNS servers, the Steam needs to be online to update Windows 10 problem should be solved. Now you can open and update Steam software without receiving any Steam fatal error message.
Conclusion
These are 9 best solutions which you can apply on your Windows 10 computer to get rid of Steam fatal error “Steam needs to be online to update. Please confirm your network connection and try again.” Try all these methods one by one and the Steam update error will be resolved.
Did you find this tutorial “how to fix Steam needs to be online to update error in Windows 10″ useful for you? If yes then feel free to share it with your friends on social media networks.
You may also be interested in checking out these Gaming tutorials:
- Top 20 Best Games like Clash of Clans for Android
- Top 20 Best Free Games Like Candy Crush Saga
- Top 8 Best Cricket Games for Android Free Download
- Top 10 Best Free Car Racing Games for Android
- Top 10 Best Free Games to Play Online without Downloading