Want to insert a picture into a Cell in Excel 2016 or lock image to a cell in Excel 2013. Here’s how to insert picture into Excel Cell 2016 / 2013 / 2010.
Microsoft Excel is the most popular spreadsheet program developed by Microsoft which is used to store and retrieve numerical data in a grid format of rows and columns.
Different people use Microsoft Excel for different purposes because it’s quite ideal for saving text-based data such as client lists, employee data, and huge mailing lists etc.
Along with the text-based data, you can also insert pictures into a cell in Excel if you want to generate an Excel spreadsheet report that includes images.

If you have ever tried inserting an image in Excel cell you might have seen that the image is placed on the separate layer which not only floats on top of the worksheet but also makes the entire worksheet look bad.
It would be better to insert picture into Excel cell which will make it look neat and organized. You can also lock the image which you have inserted in a cell in your Excel document.
To make your spreadsheets look good and organized, we came up with this post where we are going to tell you how to insert image in Excel cell 2016 / 2013 / 2010. Along with that, we will also share a method which is going to help you in locking a picture in your Excel document.
How to Insert Picture into Excel Cell 2016 / 2013 / 2010
Inserting pictures into Excel cell is a pretty simple thing if you know the correct way. There are plenty of sources (Insert a picture from your computer, Insert a picture from an online source, Insert a picture from a web page, and Replace a picture) from where you can insert a picture into a Cell in Excel but here we are going to show you the method of inserting a picture from your computer.
The below explained Excel insert image into cell process is going to be same for all versions of Microsoft Excel. Let’s see, how to insert a picture into a Cell in Excel 2016 / 2013 / 2010:
Step (1): First of all, open Microsoft Excel worksheet.
Step (2): Next, select the Cell of your Excel worksheet where you want to insert the picture.
Step (3): Now, go to Insert tab and click on the Picture option from the Illustrations section.
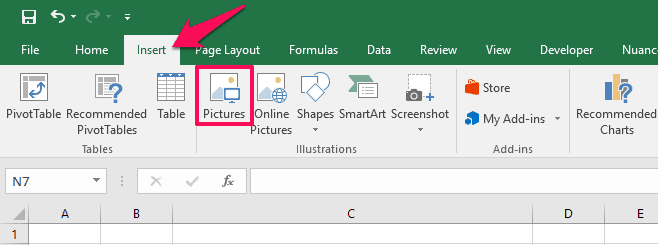
Step (4): Browse the image which you want to insert into Excel cell, select it and then click the Insert button to add it.

Step (5): Now you have successfully inserted a picture in Excel cell, you can edit the image dimensions as per your requirements so that it can fit perfectly within the cell.

To resize the image, dragging it from the edges or just manually resize the excel cell by changing the column width and row height:
- To change the column width, click on the right border of the column at the top of the spreadsheet then dragging it as much as you need for the image.
- To change the row height, click on the bottom border of the row from the left side of the spreadsheet then dragging it as much as you need for the image.
Thus, you can easily insert image into Excel cell 2016, Excel 2013, and Excel 2010 whenever you need it.
Once you have inserted pictures into Excel cell successfully, you can lock it by following the instructions mentioned below.
How to Lock a Picture to a Cell in Excel 2016 / 2013 / 2010
Once you have inserted the image into excel cell and also edited it as per your requirements, you can lock it to ensure that it is moving, filtering and hiding or getting all the changes which you are doing to the cell. Here’s how to lock picture in Excel cell 2016 / 2013 / 2010:
Step (1): At first, right click on the inserted picture which you want to lock in Excel Cell and then select Format Picture option.
Step (2): On the Format Picture window, go to Properties section and then select “Move and size with cells” option.
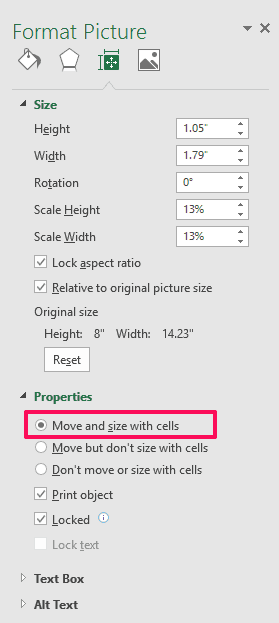
Step (3): Finally, click on Close button to save the changes.
That’s it! Now the selected image will be locked into the excel cell. Now any changes which you make to the cell will also showcase on the image which you have saved.
Thus, you can see how simple is to insert a picture into a cell in Excel document. The steps are same for all versions of Microsoft Excel.
If you are having any doubts regarding Microsoft Excel insert picture into Cell or are not able to insert picture in Excel Cell, do let us know using the comments section below. Also, feel free to share this guide “How to Insert Picture into Excel Cell 2016 / 2013 / 2010” with your friends on social media networks.
You may also be interested in checking out:
- How to Fix Spell Check Not Working in Word 2016 / 2013 / 2010
- How to Fix Outlook 2010 Search Not Working in Windows 10
- How to Increase PST File Size Limit in Outlook 2007 / 2010 / 2013 / 2016
- How to Fix “Something went wrong” Error 1058-13 in Office 2013