Are you unhappy with the slow behavior of your Windows 10 start menu? If “Yes” then apply these top 3 methods to make Windows 10 start menu open faster and smoother.
Windows 10 is finally launched and is now live on many laptops and Personal computers. People missed the Start menu in Windows 8, which is now available with Windows 10. The Windows 10 start menu has received a complete new look. Along with the classic Start menu structure, you also get the live tiles feature from Windows 8 combined with the Start menu.
The new Windows 10 start menu not only delivers a fresh look to Windows, but also removes the need of any launchers for launching applications. With the new set of features introduced by the Microsoft for the Windows 10 in order to get Start Menu back, the processing speed has been affected. In order to get the best speeds and working in Windows 10, you would need to disable this feature and that only you will be able to experience the fast blazing speeds in Windows 10.
If you are using Windows 10 and are already fed up with the slow speed of the Start menu you are at the right place as today we are going to share the top 3 methods to make Windows 10 start menu open Faster.
Related tips you might like »»
How to Make Windows 10 Start Menu Open Faster
Although, in previous Windows 10 guide I have already explained 10 most effective methods to make Windows 10 faster and improve its performance, which you can also apply to speed up your Windows 10 PC. But if you are looking for specific methods to enjoy faster Windows 10 start menu access then follow the below explained tricks.
For a quick note, I would recommend you to apply the first method “Disable Start Menu Animations” because it’s pretty simple and very effective way to make Start menu faster in Windows 10 Computer. Let’s have a look at the step by step guide to make Windows 10 start menu open faster:
Method 1: Disable Start Menu Animations
The first thing which you can do to customize Windows 10 Start menu is disable all the start menu animations. Microsoft has introduced a lot of animations in Windows 10. This is one of the reasons that the speed of start menu in Windows 10 is affected.
If the animations are enabled, the system has to start the animations first and then it will open the Start menu which affects the speed. You can easily disable animations in Windows 10, however as soon as you disable these animations, the animation effects which you are getting on your Windows 10 PC will also be disabled.
Animations desabling process is quite simple and you haven’t to do any extra setup. In order to disable animations in Windows 10, follow the below eaxplained steps:
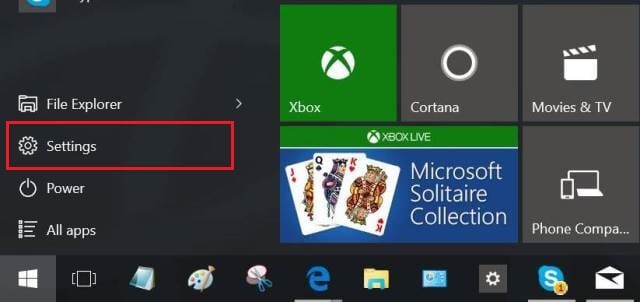
Step (1): First of all, open Settings by clicking the Start menu and selecting Settings option.
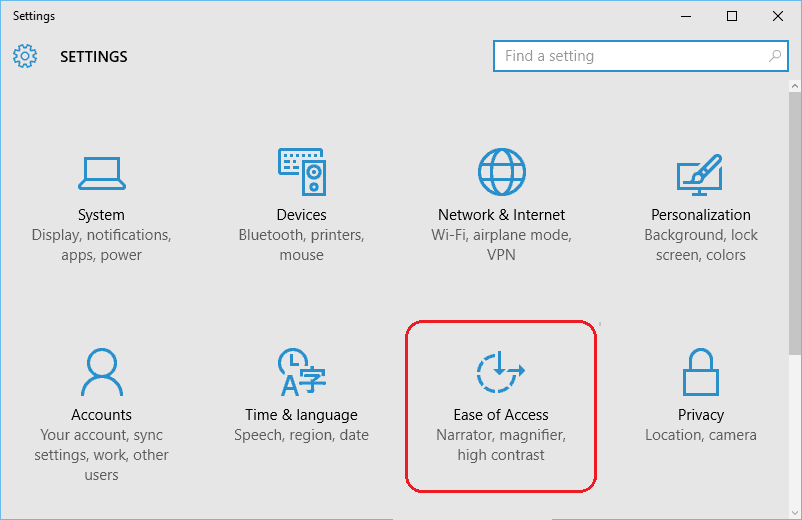
Step (2): On the Settings page, click on Ease of Access option.
Step (3): From the available options under Ease of Access, select Other options.
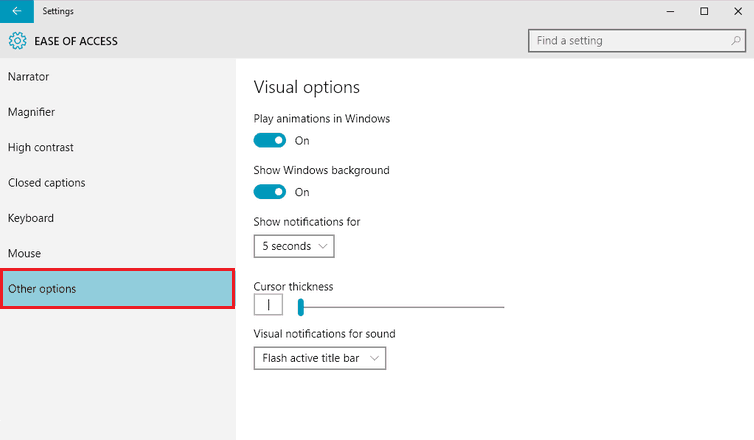
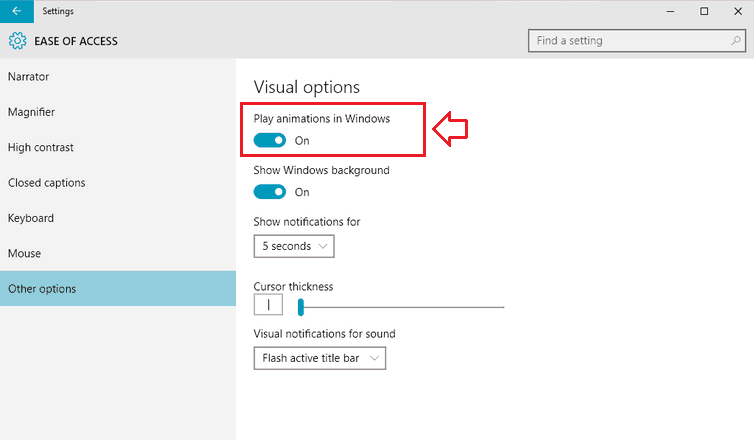
Step (4): Now, you will be able to see all the Visual options. You have to simply disable the Play animations in Windows 10 option.
That’s it! You have successfully disabled the Windows 10 Start Menu Animations. And trust me, disabling animations in Windows 10 will effectively make the Start menu open faster.
Method 2: Disable Web Search in Windows 10 Start menu
The next thing which you can do to customize Windows 10 Start menu is disable the Web Search. Whenever you are going to type anything in the Start menu of Windows 10, you will be greeted with the Search function just like the one in Windows 8.1 operating system.
The query which you will enter will be looked up on the internet. If you are having a high speed internet connection then you are fine however if you are using slow speed net connection it will affect the speed. So, if you want to get faster Windows 10 start menu then disabling Web Search of start menu in Windows 10 will play a very important role. Here’s how to disable Web Search in Windows 10 Start menu:
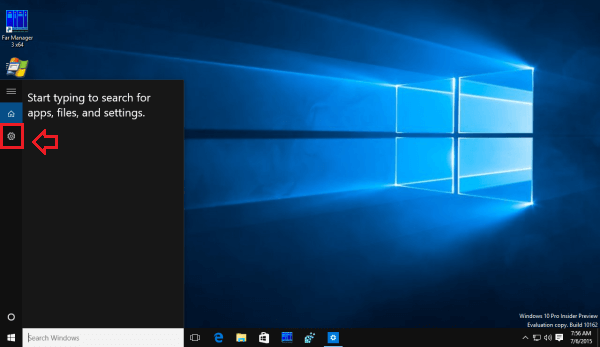
Step (1): At first, click the Search box in the Windows 10 taskbar. The Cortana pane will appear on your screen.
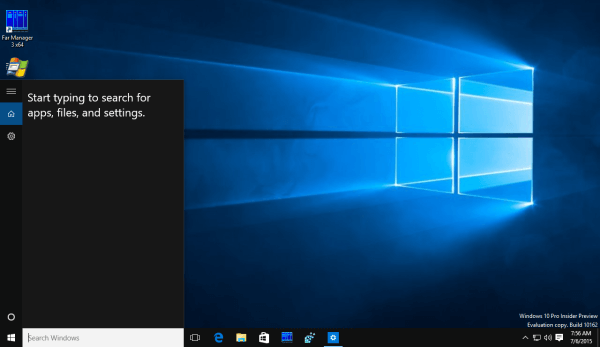
Step (2): After that, click the gear icon available at the left side of Cortana pane to open its settings.
Step (3): Now, simply turn off the option “Search online and include web results” as shown in screenshot.
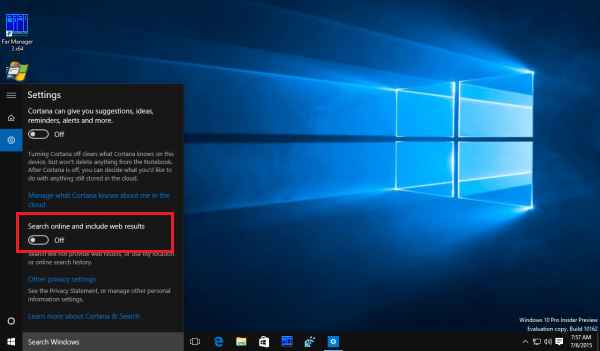
That’s it! This action will disable web search in Windows 10 start menu and you will be able to enjoy faster access of start menu in Windows 10 PC.
Method 3: Rebuild & Select Indexing Options
The last thing which you can do to open Windows 10 start menu faster is selecting the indexing options. There is one more feature available in the search feature which could slow start menu. All the files which are stored on your PC will also get indexed when you are going to search anything.
So, if you are going to search anything from the start menu, the results will be displayed after searching from the Hard disk and the Web. You can easily remove some selective files and folders which will help in getting faster Windows 10 start menu.
Here’s how to modify Windows 10 search indexing options to make Windows 10’s search lightning fast and more useful:
Step (1): Firstly, go to Start Menu and type “Indexing Options” in the search tab and click Indexing Options from the search result.
Important note: To access the Indexing Options, you might require the PC administrator’s permissions. So, if it doesn’t open simply then you should open it with the administrator privileges.
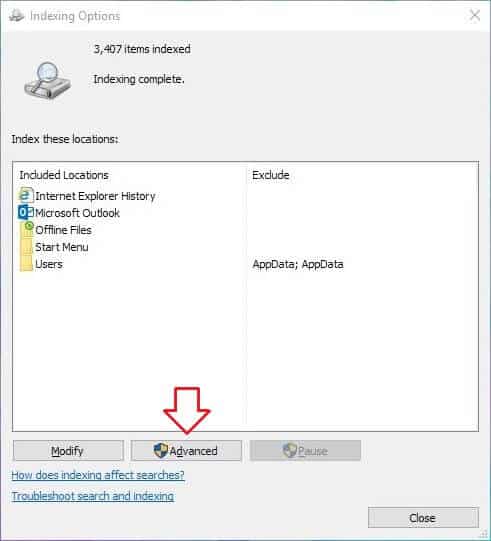
Step (2): Now you will be able to see the list of locations included in the search.
Step (3): In order to set up your preferred search location, click the Advanced button.
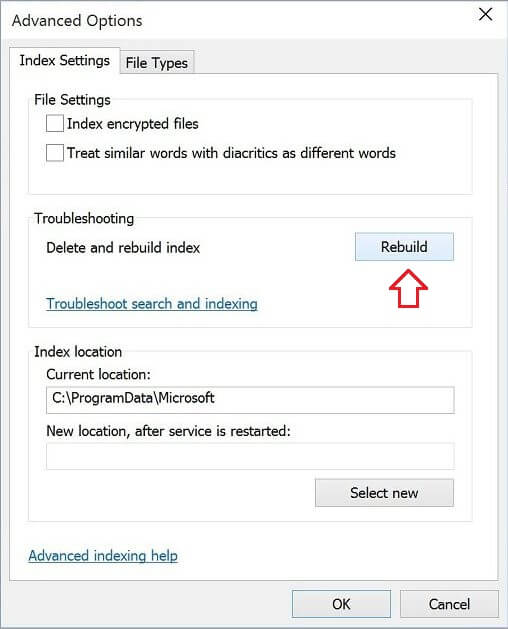
Step (4): From the Advanced dialogue box, click the Rebuild option. Selecting the Rebuild option will begin the process of deleting and then rebuilding your Windows 10 PC’s search index. Keep patience, this is a time consuming process.
Step (5): Once the rebuilding process is completed, you can select/change the locations of indexing which you are interested in getting indexed. To change the indexing location, click Select new option and select your preferred location.
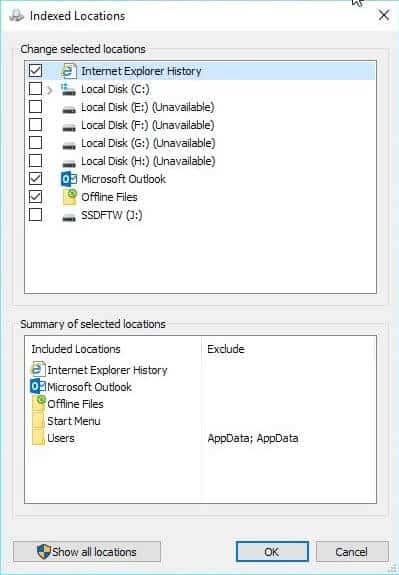
Step (6): Once, all the settings it done. Simply, click Ok button. That’s it!
These are the tree best methods which will help you to make Windows 10 Start menu open faster. We are finding new methods also which will increase the speed of Windows 10 PC and will bring better options and will share them soon.
We hope you are able to get better speed while accessing Windows 10 start menu after following these methods. Let us know using the comments section below – Which method to make Windows 10 start menu open faster worked for you?
